


3Dnatives Lab: Testing the Einstar 3D Scanner From SHINING 3D

Founded in 2004, SHINING 3D is a Chinese manufacturer of both 3D printers and 3D scanners. With a particular focus on the medical and dental sectors, the brand has grown internationally in recent years and now has offices in China, Germany and the United States. Today, its product range includes desktop 3D scanners, dental scanners (intraoral), metrology scanners, but also desktop and dental resin 3D printers.
The Einstar 3D scanner, one of the latest additions to the range, is distinguished by its price. It is the first 3D scanner marketed by SHINING 3D for less than €1,000. Based on the experience acquired by the manufacturer over the past several years, it is now positioned on the market of entry-level professional 3D scanners. We had the pleasure of receiving the Einstar 3D scanner from SHINING 3D and were able to test it over the past few weeks in the 3Dnatives Lab. So how does this scanner stand out from the competition? Does it still perform well despite its entry-level price? See what we thought!
Unpacking the Einstar 3D Scanner
When you receive the SHINING 3D Einstar, the box, which is barely wider than a shoebox, confirms that it is indeed a compact portable 3D scanner. As soon as you unpack it, you discover a hard fabric carrying case. This case protects the scanner during transport and allows users to carry the scanner and its accessories easily. In the main part of the carrying case, users will find the scanner, its connection cables and a micro-fiber cloth while a second pocket shelters the calibration board which itself includes its own protective cover. In the net, there is an instruction manual as well as sticky markers.
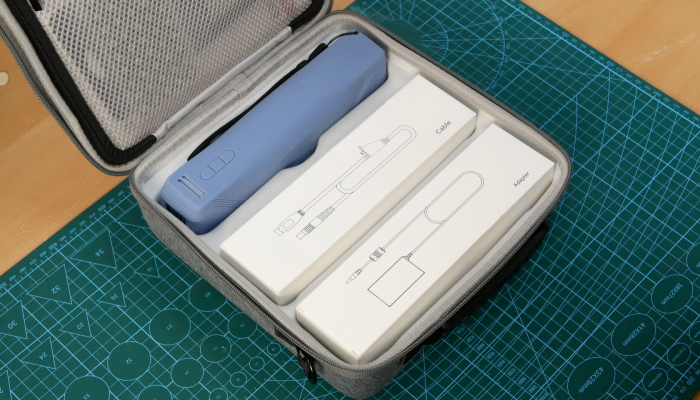
The scanner is delivered in a case allowing to transport it with its accessories
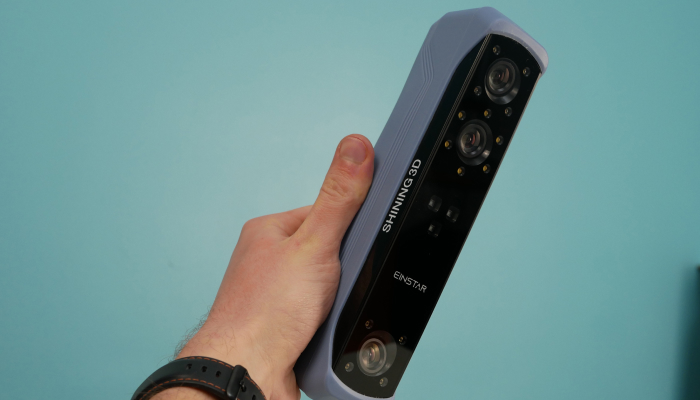
As one might imagine, the Einstar is portable and light since it measures only 220 x 46 x 55 mm and weighs just 500g. Note however that the Einstar remains a wired model, so you will always have to use it connected to a PC. By default, the scanner is delivered with a protective silicone shell that covers it entirely except for the front panel. The latter is made of a glass plate behind which are located two cameras used to capture the depth, an RGB camera useful for the acquisition of the color, three VCSEL infrared projectors as well as a set of LEDs.
When taking the 3D scanner out of its protective silicone cover, we discover a screw thread to fix the Einstar on a tripod. Apart from the front panel, the scanner is entirely made of an aluminum chassis on which we find three buttons and two RGB LEDs at the back. Its chassis is robust with a modern and minimalist design, making it easy to use and handle. Moreover, the materials used for the construction of the scanner make it particularly high-quality.
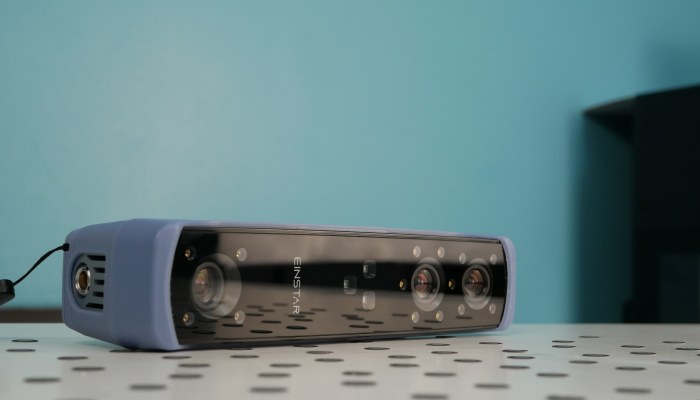
The Einstar has a minimalist and elegant design
The Einstar is a 3D scanner with structured light. It works by projecting a structured light on an object, then using cameras to capture the image of the object with the structured light projected on it. By measuring the deformations of the structured light on the object, it is possible to calculate the 3D coordinates of each point on the object. These 3D coordinates are then used to create a point cloud that can be converted into a 3D model of the object.
Installation of the SHINING 3D Einstar Scanner
Once the SHINING 3D Einstar is installed and its accessories are unpacked, the manual tells you to connect the scanner to a cable that groups the power supply and the serial (USB) connection, then connect the power supply to this cable and finally connect the USB connector to the computer port.
Before starting to scan, you will have to download the proprietary software developed by SHINING 3D, Exstar. Indeed, although portable, the scanner is dependent on a connection to a PC to operate. Moreover, this PC must have a high computing power. The minimum recommended configuration is a computer running Windows 10 or 11 and having a GTX 1060 GPU with 6 GB of video memory, an Intel I7-11800H processor and 32 GB of RAM. In addition, Exstar is, for the moment, only compatible with Windows, which makes the Einstar incompatible with Linux and macOS.
The calibration of the Einstar 3D scanner is easy thanks to the dedicated section of the software and the calibration board provided
Once Exstar is installed, it is recommended that you calibrate the Einstar. To do this, simply place the calibration board on a flat surface and then launch the calibration procedure from the dedicated section of the software which guides the user intuitively through the process. The next step is to make the white balance, a simple parameter to set by turning the calibration board over and performing the adjustment process.
These calibration steps ensure an optimal scanning according to the scanning conditions. It is then advisable to carry out them regularly, in particular after transport to obtain better results. Compared to other models of the manufacturer, the low cost of the Einstar is justified in particular by its demanding system requirements (minimal PC configuration) and its data acquisition speed (14 images per second)
Exstar Software
The proprietary Exstar software is developed by SHINING 3D and is compatible with all the manufacturer’s scanners. It is a free software with advanced features for scanning objects. All post-processing features available with the manufacturer’s professional scanners are also compatible with the Einstar.
The Exstar software developed by Shining 3D is divided into sections to make handling easier
The software interface is divided into sections, each representing a different step of the 3D scanning process (scanner calibration, 3D scanning, post-processing, measurements), which makes scanning easy to learn for a novice.
The first section allows for the easy calibration of the Einstar thanks to the calibration board provided in the transport palette (see installation). The second section then allows users to preview the scan, to launch the digitization, to make various modifications on the point cloud thanks to selection tools and cutting planes, and to export the point cloud in a mesh. The scan interface can be controlled, in part, directly on the scanner. Thus, with the three buttons on the back of the scanner, it is possible to launch the preview, the scan and to modify the brightness and zoom settings.
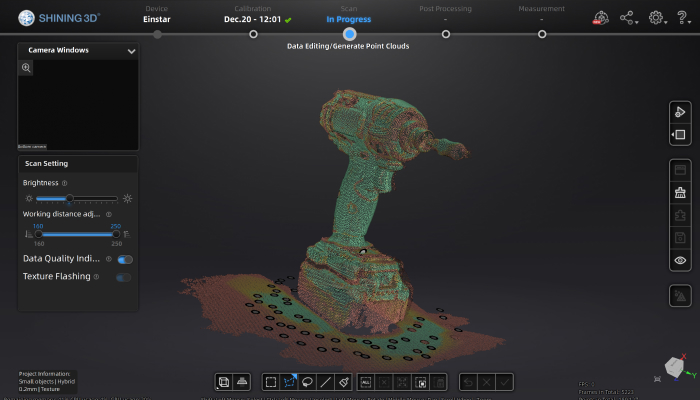
Exstar allows users to quantify the quality of the scan, on the point cloud, by assigning a color (green) to the best scanned areas
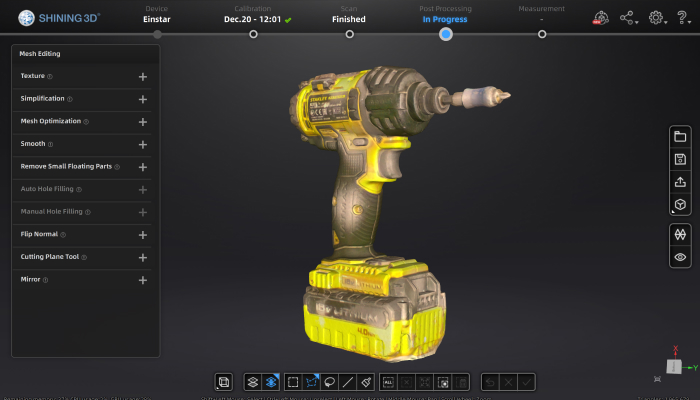
The third section is useful to modify the mesh before the final export to a CAD software, Virtual Reality/Augmented Reality or a slicer to print in 3D. Finally, the “Measurements” tab allows you to take dimensions on the scanned model.
First Scans
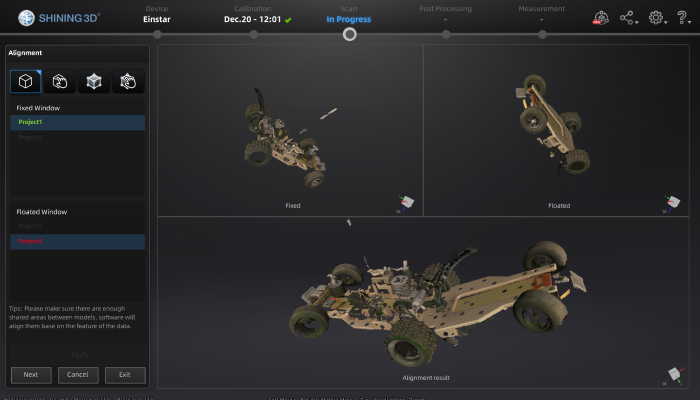
After unpacking, installing and calibrating the SHINING 3D scanner, we can start our first scan. Just go to the scan tab of the software, create a new project by choosing the mode (small object or medium/large object) and the type of alignment (Specificity, Colors, Hybrid, Markers).
The scan tab is thus opened and it is now possible to modify the zoom and brightness settings via the scanner buttons. Once all the settings are done, the preview and the scan can be launched, also with the scanner buttons.
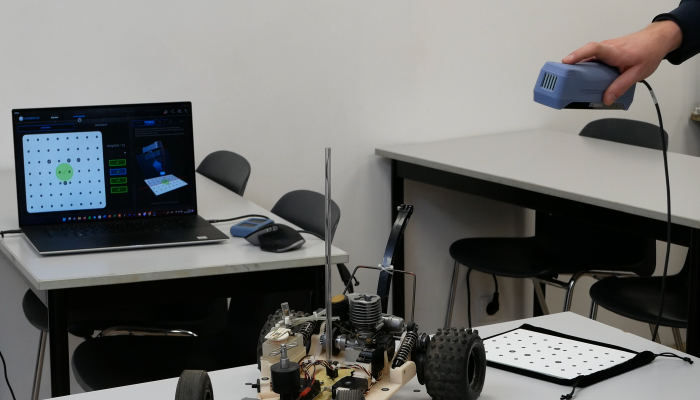
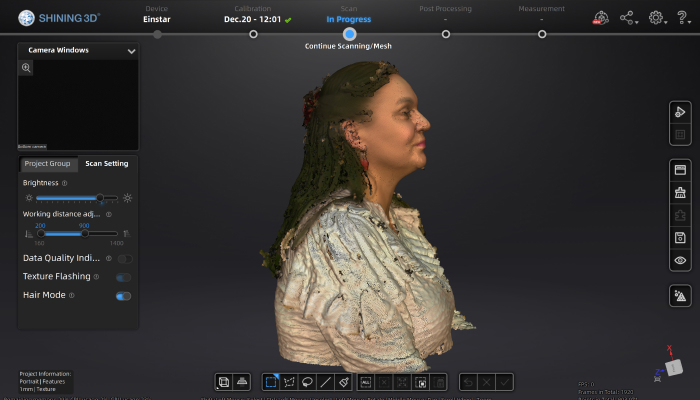
During our test, we were able to scan various objects and people. Whatever the size of the scanned object, we obtained faithful digital copies of our physical objects. The “person” mode of the software pleasantly surprised us by its speed of scanning while maintaining a quality that allows to reproduce all the details of the face and the human body.
The Einstar 3D scanner is compact and easy to handle
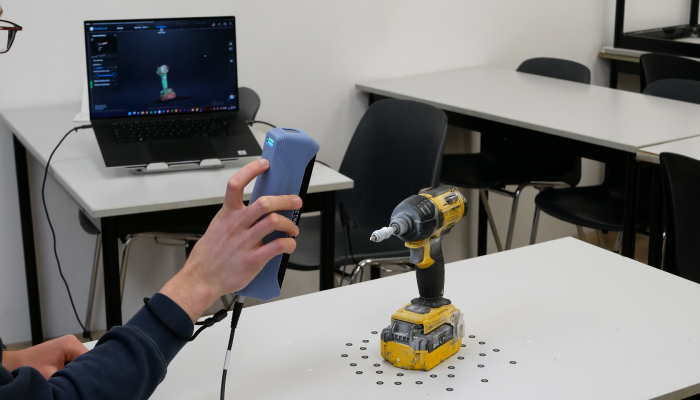
Due to its small size and light weight, the Einstar from SHINING 3D can easily scan various objects. The scanner is easy to handle and allows you to scan objects from every angle. During the scan, it will be necessary to completely turn the scanned object. This operation can be done manually or with the help of a rotating plate that allows the scanner to be fixed to a tripod to avoid any clutter with the cable connecting the scanner to the PC.
During the scans, it sometimes happens that you can lose the tracking of the scanned object. In this case, you should point the scanner at a previously scanned area to continue scanning. When scanning parts with reflective or transparent areas (such as a vase, a shiny metal tank or a screen), it will be necessary to mattify the object with a suitable spray such as those marketed by AESUB since the structured light scanning technology depends on non-reflective areas to work.
Sometimes areas with similar geometries can occur. In this case, the automatic merge may present errors. In this case, it is advisable to use the semi-automatic merge by selecting 3 self-adhesive targets
To improve the scanner’s performance on large flat areas or on objects that are difficult to scan, the self-adhesive targets supplied with the scanner should be used. These help the scanner to follow the object in 3D space, thus improving data acquisition.
When scanning an object, it is possible to make several scans within the same project. These scans can then be merged with each other using Exstar’s dedicated tools. These merges can be done manually, but the software also offers automatic merge functions, advanced features that avoid tedious manual retouching.
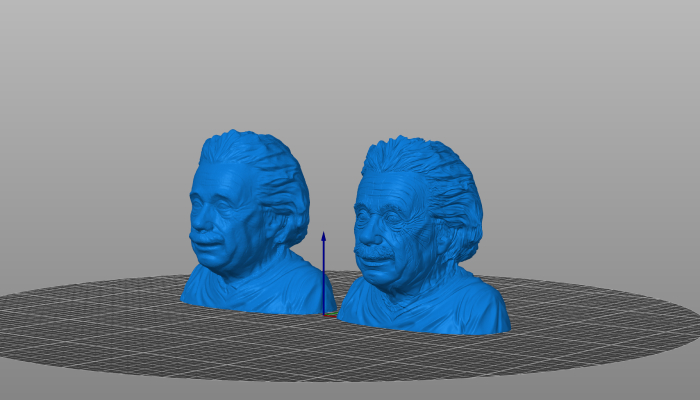
On the right, the original 3D model. On the left, its reproduction obtained by FDM 3D printing after a 3D scan with the Einstar

*All Photo Credits: 3Dnatives
Conclusion
- Scanner Features and Accessories 9.5/10
- Software 9/10
- Scan Quality 10/10
- Ease of Use 9.5/10
Pros:
- Portable
- Price
- Software offering advanced features
Cons:
- Dependent on a computer
- Resource-intensive software
- No Mac/Linux compatibility
Developed by the SHINING 3D team to expand its range of scanners and offer a serious entry-level option, the Einstar 3D scanner stands out from the competition thanks to its affordable price and interesting features, all while being compatible with a relatively complete software.
The dimensions and the reduced weight of the Einstar allow for an easy use of the scanner for the scanning of various types of objects in spite of a constant dependence on the computer. In addition, it is necessary to take into account the fact that the computer must have a relatively advanced performance in order to take full advantage of the Einstar’s capabilities. Still, we appreciated the interface and the numerous options of the Exstar software although it is only compatible with Windows 10 (or more recent).
To conclude, the Einstar is a very valid option in the portable 3D scanner market and will allow you to easily perform professional quality 3D scans, all at an affordable price starting at $959 (€960). To learn more about the Einstar and all the products offered by SHINING 3D, visit their website HERE.


