

3Dnatives Lab: Testing Meshy Edit, the AI Model Editor, for 3D Printing
In September, we put Meshy 7.1 through the 3Dnatives Lab and looked at what the slicer actually receives when you turn a photo into a 3D model. For simple objects, Meshy did what it promised, and every surface the camera did not see was a guess. The Ligier JS2 R race car model came out convincing, but with wing supports and mirror stems about a millimeter thick. The Jacob & Co. Astronomia watch came with a strap loop and a buckle that Meshy had invented. The Le Mans cathedral was missing its nave. At the time, the only way to change one part of a model was to generate it again and hope, and a new generation changes everything, including the parts you liked.
Meshy Edit, launched on October 16, 2026, promises the opposite. You circle the part you want to change, describe the change in one sentence, and about a minute later you get a new version of the model in which only that part has changed. For 3D printing, that is the point: once a figurine is sliced and scaled, you want the same figurine with one change.
So we went back to the Lab to see whether Edit can fix one part of a model without touching the rest. We ran 36 edits on 11 models (Meshy’s own showcase examples, our mascot Leo, the September models, a figurine and a series of Leo collectibles) and measured every result against its original.
1. Getting Started, Credits and Limits
Edit sits in the toolbar under the model viewer, and Meshy also places it in the Print workspace, in the Post-Processing panel. Meshy says it is available to every registered user, not only to paying plans, and that an API should follow in early December. Each edit costs 20 credits, against 25 for a new generation at Ultra 2K, and a failed edit is refunded automatically, which happened three times during our test.
According to Meshy’s help center, Edit works on models generated in Meshy with Meshy 6 or Meshy 7.1, up to Ultra 2K, and not on Ultra 4K, low-poly, uploaded, split, rigged or animated models. We confirmed two of those limits. On an Ultra 4K model, the Edit button is grayed out. On an uploaded model, it is grayed out and does nothing. Textured models do open in Edit, with a note that editing runs on the untextured version, and the texture is lost.
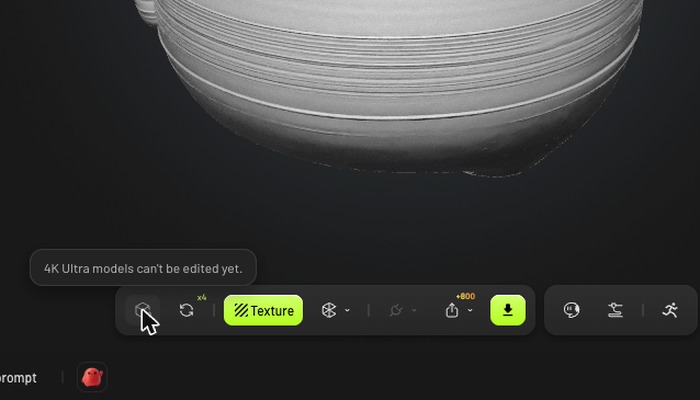
On an Ultra 4K model, the Edit button is grayed out: “4K Ultra models can’t be edited yet”.
2. The Tool
Edit opens the model in an editing mode with two selection tools. Lasso draws a loop on screen and selects everything inside it, through the whole model, so circling a hand from the front also takes the back of the hand. Brush paints a selection on the surface, and two erasers remove parts of it. An on-screen tip sums up Meshy’s advice: a generous loop works better than a tight one.
You then type what you want in one plain sentence, with up to five reference images if you like, and a Retry button runs the same selection and prompt again. Meshy warns that results vary, that removing something is harder than adding something, and that accessories worn on the body are the most reliable case. Every edit creates a new model, so the original stays in your library and you can edit an edit. That turned out to be the most useful feature of the tool.
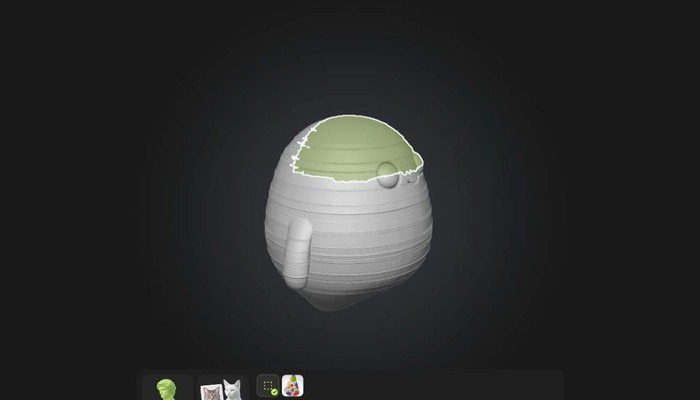
The Edit mode: a lasso selection around Leo’s head, with the prompt underneath.
3. Test Method
We regenerated the September inputs with the same settings (Image to 3D, Meshy 7.1, Ultra 2K, no texture), added a Leo generated with Meshy 6 and an armored figurine, and, to match Meshy’s own marketing, made four models from images generated with Meshy’s image generator. For each edit, we saved the selection, downloaded the result as a 3MF file and logged the time and the credits.
Meshy exports every 3MF at the same height (50 mm by default), so to compare an edit with its original we first aligned the two meshes, then measured how much of the original surface was still within 0.25 mm of the edited one, about one FDM layer. The part you asked to change is expected to move, so the bigger the change, the lower the number. As a control, we generated Leo again from the same image: only 32% of the surface stayed within 0.25 mm, and 22% for the Ligier. Most of our successful edits kept between 88% and 97%.
4. What Came Out
Meshy’s Own Examples
We began with Meshy’s own examples. Its launch visual shows a pirate bust with the prompt “Remove the hat”, its teaser video a seated statue getting snow boots and a capybara whose fruit turns into a crown, and its tutorial a cartoon explorer. We made our own versions of all four and used Meshy’s prompts.
On this kind of model, Edit does what Meshy shows. “Replace the bare feet with snow boots” gave the statue padded snow boots and left the rest alone. “Replace the orange with a crown” produced a detailed crown on an unchanged capybara, with 97% of the surface in place. On the explorer, “Add round glasses” put frames over the eyes, still visible through the lenses, and “Replace the boots with sneakers” gave him laced low-top shoes.
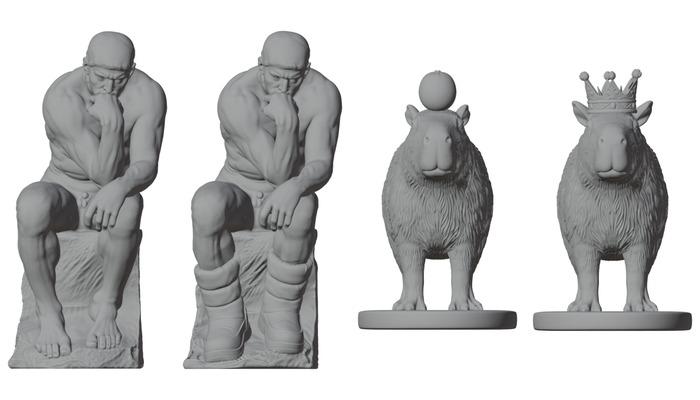
Meshy’s own examples, before and after: snow boots for the statue, a crown for the capybara.
“Remove the hat” worked too: the tricorn disappeared, and Meshy filled the space with long hair and a bandana of its own invention while the face, beard and necklaces stayed put. It was the only removal that worked in our whole test. “Remove the backpack and its straps” only half worked, leaving the straps on the shoulders, and “Add a wide-brim explorer hat” failed on the first run and gave a flat, thin brim on the second. Edit is strongest when it swaps one part for something of a similar size and position, which is what every one of Meshy’s showcase examples does.
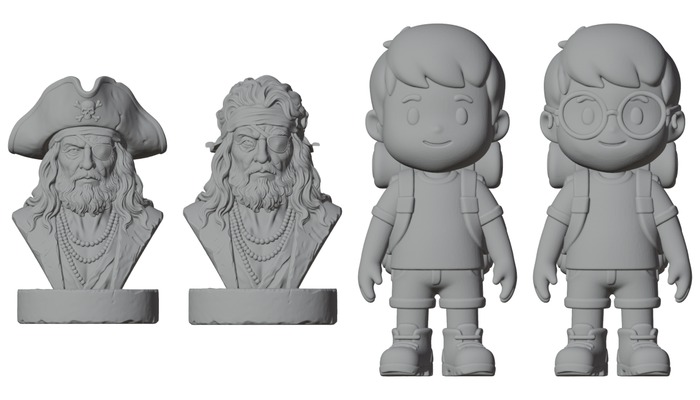
The pirate bust without its hat, and the explorer with round glasses.
Leo, The 3Dnatives Mascot
Leo, a round, waving figure, is close to the kind of model Meshy recommends. We circled the top of his head and asked for “a classic cone-shaped party hat on top of the head, slightly tilted, with a thick rim”. About a minute later, Leo had a hat, a face that had not moved and 94% of his surface in place. The hat, however, was a flat-topped bucket, not a cone. We ran the exact same edit twice more: the second run returned a small curl and no hat, and was charged like a success, and the third a hollow, tilted bucket. Over the whole test we asked four times for a tall pointed hat and never got one. Low, wide accessories worked much better.
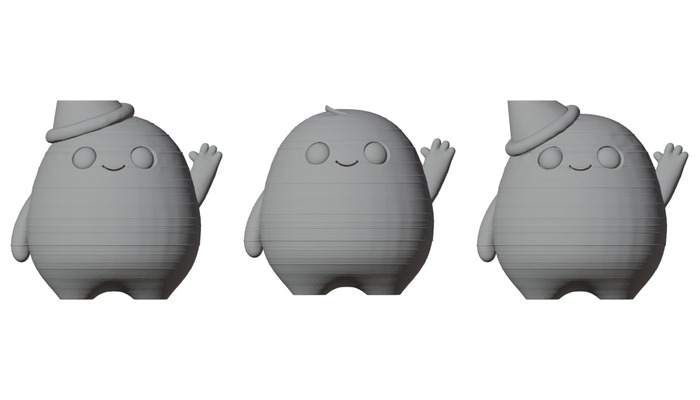
The same party hat prompt, run three times: a bucket, a curl and a hollow bucket.
Turning the first bucket into a baseball cap was one of the best edits of the test. A swim ring around the waist was convincing, even if Leo’s lower half came back slightly squatter. Sunglasses worked, but Meshy redrew the eyes underneath, and with a tight selection the arms of the glasses grew outside it. Clothing was the clear failure: asked for a Hawaiian shirt, Edit pulled the shirt over Leo’s head like a hood, erased his left eye and turned his hand into a stump, keeping only 28% of the surface. The larger the area you select, the more of the model Edit redraws.
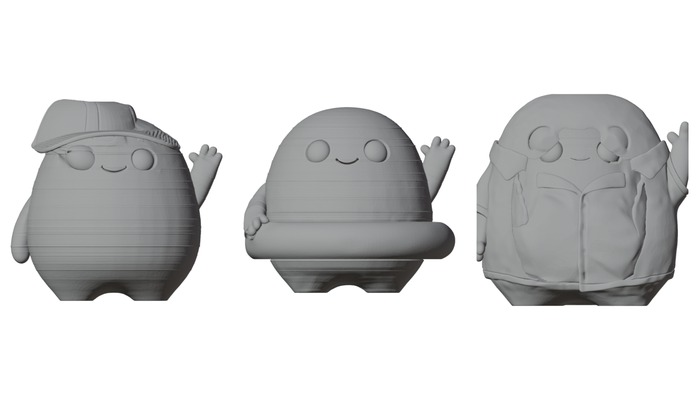
A cap made from the first hat, the swim ring, and the Hawaiian shirt that cost Leo an eye and a hand.
Fixing the September Models
The September models are the most useful test for printing, because each was nearly right, with one part to fix. On the Ligier JS2 R, we asked for solid side mirrors on thick stems and got exactly that, with 93% of the car unchanged and 99.7% within a millimeter. Thicker rear wing supports worked less well: the supports got thicker, but the wing turned into chunky blocks. One side effect is welcome: the Ligier we regenerated for this test came out as 11 separate bodies, and both edited versions came back as a single one.
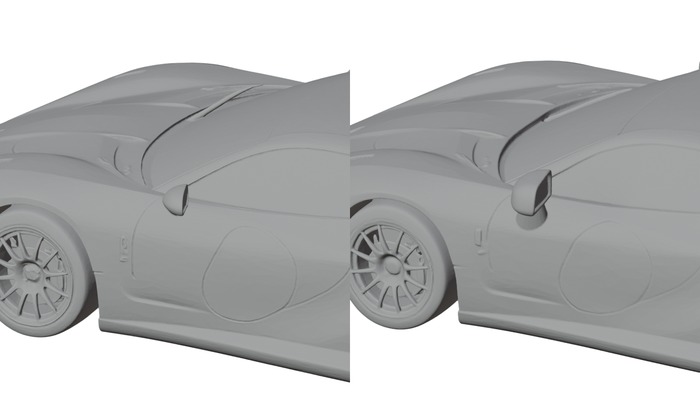
The Ligier’s mirror before and after the edit.
Removing the strap Meshy had invented on the Jacob & Co. failed twice. The first attempt redrew a shorter strap, and the second wrapped the watch in a torn shell full of holes and quadrupled the file to 4.3 million triangles, while Meshy’s printability check still showed a green tick.
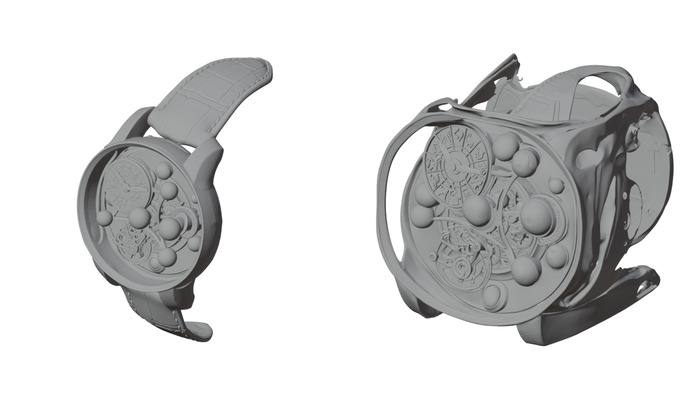
The Jacob & Co. before and after the second attempt to remove the strap.
On the cathedral, asked to add the long nave to the west, Edit built a tall Gothic block with a round tower. The choir was untouched, but the building was still the wrong shape. And on the Seiko, where Meshy had modeled the forearm and hand along with the watch in September, both attempts to remove them failed with “Editing failed, credits refunded”. Meshy says removals often need several tries. On a dense object or a large part, none of ours worked.
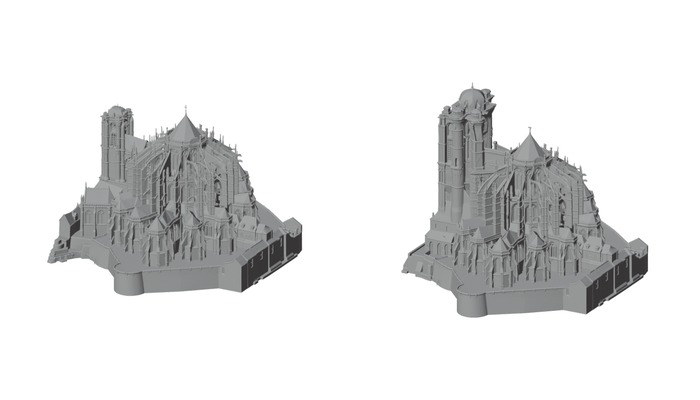
The cathedral before and after: a new block where the nave should be.
A Figurine and a Series of Collectibles
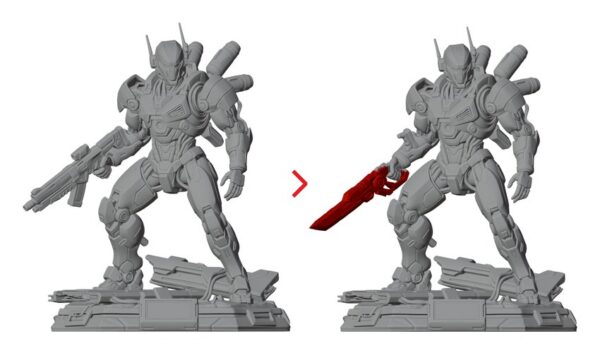
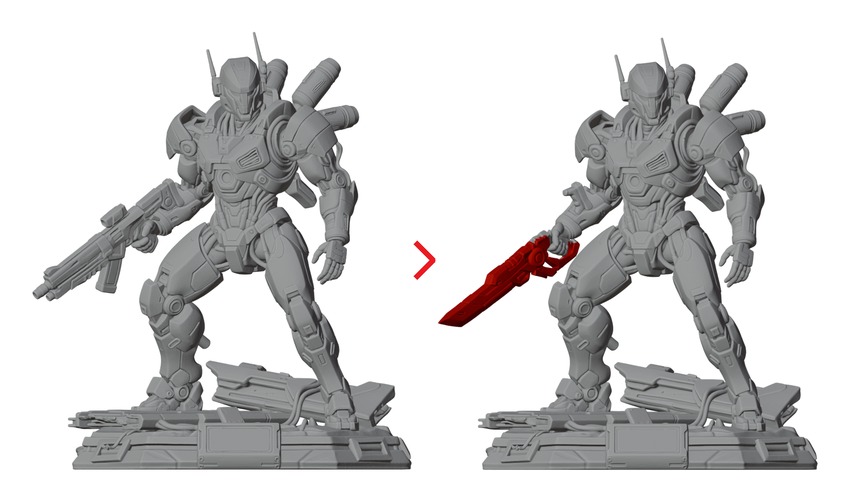
Meshy pitches Edit at figurines where the pose and the face are right and one part is not. We generated an armored figurine holding a rifle, circled only the rifle and asked for a short sci-fi sword in the same hand. The sword arrived in the same hand, and the helmet, pose and base did not move: 97% of the surface within 0.25 mm. It was long rather than short, but this is the use Meshy describes, and it worked.
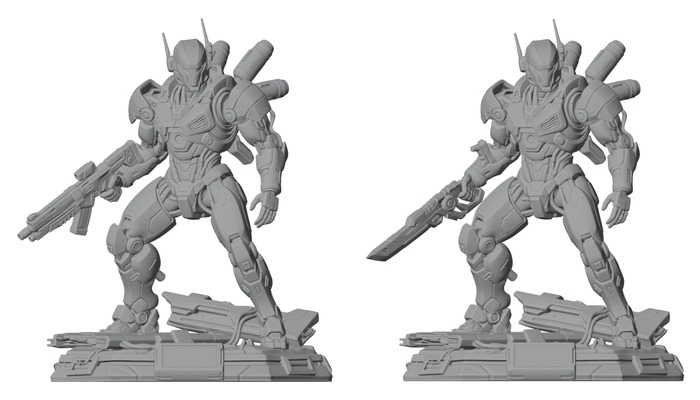
The armored figurine before and after: the rifle became a sword, and the rest did not move.
Then we did what a fan would do and made a series of Leo collectibles from the same model, with text prompts only. The best was Leo typing on a laptop: we selected both arms and the belly, and Edit changed the pose, hands on the keys. The hockey helmet and the jack-o’-lantern bucket were well made, though the stick and the bucket landed in a different hand from the one we selected. The World Cup ball replaced the waving hand, the roller skates came without wheels, and raising the arms only worked once we also selected the space above the head, where the hands had to go.
Every variant kept between 88% and 97% of Leo’s surface, and Leo stayed recognizably Leo, which is the point of a collectible series. The series also taught us to select the place where the new part has to go, not only the part being replaced, and to build a variant in two or three small edits rather than one big one.
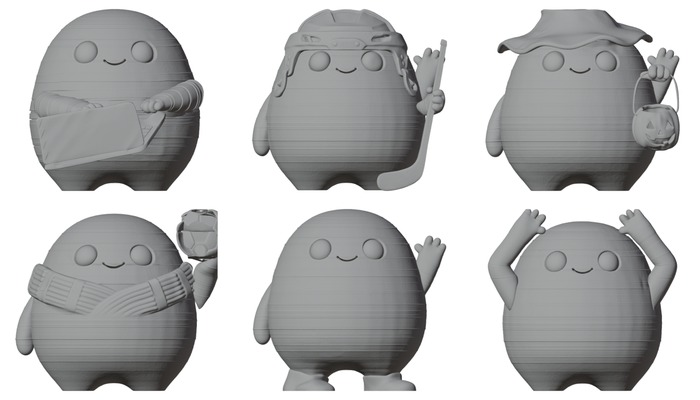
Six Leo collectibles from one model: laptop, hockey, Halloween, World Cup, roller skates and arms raised.
Edit or Regenerate?
To see what Edit adds, we asked for the same party hat two other ways. Meshy’s 3D Agent generated a new concept image (12 credits), then a new model (30 credits): the hat was a clean cone, but the rest was a new Leo. Text to 3D, which Meshy announced it would fold into the Agent on October 31, gave us a cone hat on a completely different character. If you want a different object, regenerate. If you want the same object with one change, Edit is the only one of the three tools we tried that keeps what you already have.
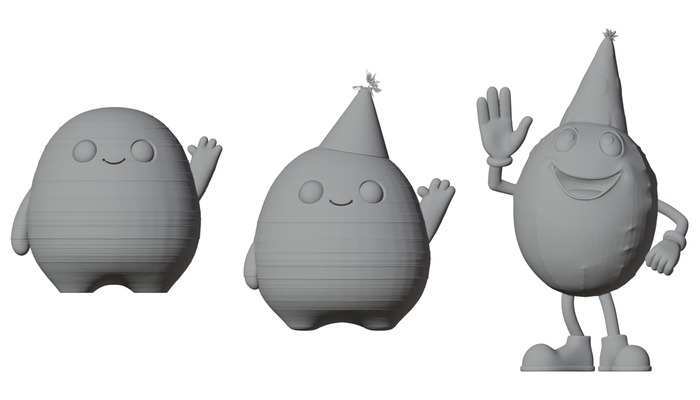
Our Leo, the 3D Agent’s version and the Text to 3D character, all asked for the same party hat.
| Model | Edit asked | Result | Surface kept within 0.25 mm |
| Capybara | Replace the orange with a crown | Detailed crown, rest unchanged | 97% |
| Armored figurine | Rifle to a short sword | Sword in the same hand | 97% |
| Explorer | Add round glasses | Glasses, eyes still visible | 96% |
| Leo | Cone party hat | Flat bucket, not a cone | 94% |
| Ligier JS2 R | Solid side mirrors | Mirror on a thick stem | 93% |
| Explorer | Boots to sneakers | Laced sneakers | 92% |
| Seated statue | Bare feet to snow boots | Padded snow boots | 82% |
| Pirate bust | Remove the hat | Hat gone, bandana invented | 77% |
| Leo | Swim ring | Ring at the waist, body squatter | 70% |
| Explorer | Remove the backpack | Pack gone, straps left | 69% |
| Leo | Hawaiian shirt | Hood, missing eye, hand a stump | 28% |
| Leo (control) | Same image generated again | A different Leo | 32% |
The share of the original surface still within 0.25 mm after each edit, on a selection of our 36 edits. A plain regeneration of the same image is the control.
5. Before you print: three checks
First, size. Meshy exports every model at a fixed height: 50 mm by default, or the size you enter after switching on Resize in the Download Settings panel. When an edit adds height, the whole model is scaled down to fit: after the party hat, Leo’s body was 7% smaller. Set the height with the new part in mind, or rescale in the slicer.
Second, separate parts. Added accessories often arrive as separate shells: the party hat was its own body, the hockey Leo had 9 bodies and the laptop Leo 18, and on the arms-raised Leo one arm floated free. Slicers usually merge overlapping shells, but a floating part will fall off, so check the objects list before you print.
Third, file size. Each edit adds triangles: our new Leo went from 300,000 to 730,000 after two hat edits, and the Jacob & Co. reached 4.3 million. Meshy’s printability check stayed green on every edit, including the torn shell, so do not rely on it alone.
Conclusion
Pros:
- Most of the model stays where it was
- Swaps of a similar size work on the first try
- Every edit is a new version, so the original is never lost and edits can be stacked
- Failed edits are refunded, and an edit costs less than a new generation
Cons:
- Tall pointed shapes, clothing over large areas and removals from dense objects mostly fail
- The same prompt can give three different results, and retries cost 20 credits each
- Ultra 4K and uploaded models cannot be edited, and textured models lose their texture
Meshy Edit keeps its central promise. On a good edit, most of the model stays within a quarter of a millimeter of the original, where a regeneration of the same image keeps between a fifth and a third. Swaps between parts of a similar size are its strongest case: boots, sneakers, a crown, a cap, glasses, a sword for a rifle, a sturdier mirror.
Clothing over large areas, tall pointed shapes and removals from dense objects did not work, and the same prompt can give three different results, so plan on retries. Edit does not replace CAD for functional parts, and it will not rescue a model whose overall shape is wrong, as the cathedral showed.
For hobbyists, small businesses and anyone building variants of a character they already like, Edit gives you control over one part of a model instead of starting again. Just check the file before you print it: Edit changes the part you asked for, and sometimes the size and the number of bodies with it. To find out more about Meshy Edit, visit the company’s website HERE.
Have you tried Meshy Edit on a model of your own? Let us know in a comment below or on our LinkedIn or Facebook pages! Plus, don’t forget to sign up for our free weekly Newsletter to get the latest 3D printing news straight to your inbox. You can also find all our videos on our YouTube channel.