


Zoom in on Open-Source, 3D-Printed Camera Equipment
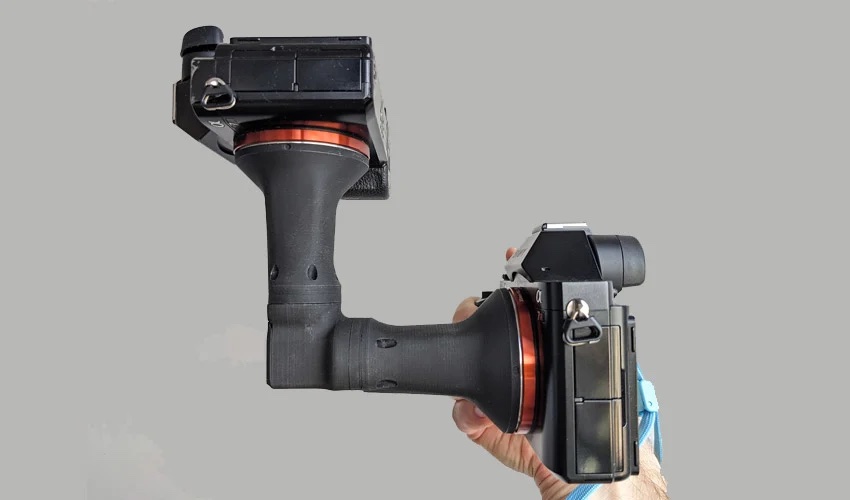
Some projects using 3D printing are so unique and original that we can’t help but tell you about them. This time, we turn our attention to the world of photography and the work of amateur photographer Nicholas Sherlock, who has devised a 3D-printed lens system to provide optimum magnification and immortalize living organisms in their natural environment. And when you look at the result, you can’t help but be amazed at the shape of the camera – or rather cameras, as this 3D-printed camera equipment solution combines two lenses, with incredible results. Indeed, the photos taken by the creator of this system are breathtaking.
Nicholas Sherlock is a young software developer based in New Zealand who quickly fell in love with photography. He was quick to customize his camera equipment using 3D technologies – his website reads: “When I couldn’t find the photography equipment I wanted, I designed it myself and 3D-printed it!”. Indeed, Sherlock has designed 3D-printed tripods, lens adapters and the famous “3D macro lens,” which offers double the magnification and an 18 x 12 mm field of view.
STL files are available on the Printables website
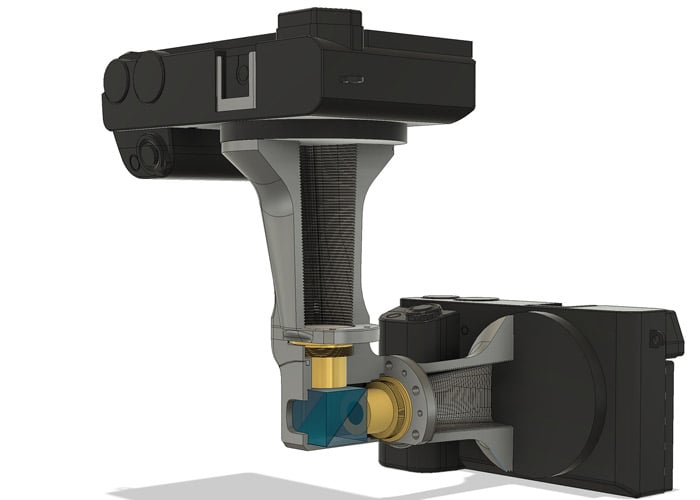
This 3D-printed photographic equipment is available as open-source on the Printables website. Nicholas has made his 3D files available and explains that he will soon be offering this product for sale, for anyone who doesn’t have a 3D printer. It is compatible with two Sony E/FE cameras and includes two 4x microscope lenses to offer 2x zoom. The photographer explains that the microscopes shoot through a beam-splitting prism, so one camera is mounted at the top or bottom of the equipment, while the other is aimed normally at the subject.
He gives some printing tips on the Printables site, explaining that he used black ABS+ from eSUN, but also recommends ASA – you still need to use a strong material. Several print parameters are communicated, including layer height, fill, print media, etc. The aim is really to share his invention with a large community of enthusiasts.
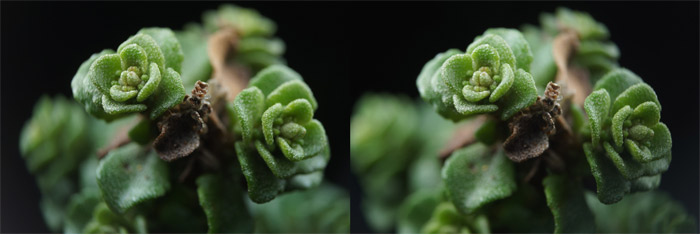
Take a look at these photos by performing the test shown below
Nicholas Sherlock explains how to look at photos taken with this 3D-printed photographic equipment: “If you hold your finger up in front of your face and look at it, your eyes converge (cross) in order to both point at it. If you now move your finger towards you and away from you, in the background you will see the two side-by-side photos cross over each other more and less, respectively. Move your finger until both images in the background fully fuse together to form a third image in the middle of your field of view. The trick is now that you need to keep your eyes at the same convergence (still crossed to point at your finger) but you need to refocus to look at the monitor. This takes some practice, but once you get good at it, you can cross your eyes at will without using a finger. The fused third central image will now appear to be 3D.” Feel free to do so in the photo above!
You can also learn more on Nicholas’ website HERE. What do you think of this 3D-printed photographic equipment? Let us know in a comment below or on our LinkedIn, Facebook, and Twitter pages! Don’t forget to sign up for our free weekly Newsletter here, the latest 3D printing news straight to your inbox! You can also find all our videos on our YouTube channel.
*All Photo Credits: Nicholas Sherlock


