


The Infill Puzzle: Cracking the Code for Perfectly Balanced 3D Prints
Infill serves a vital purpose in 3D printing, offering precise control over the interior structure of printed parts. Unlike traditional manufacturing methods like injection molding or subtractive manufacturing, 3D printing allows for the creation of intricate infill patterns and adjustable infill density. Infill refers to the internal structure of a 3D printed part, providing support, strength, and rigidity while influencing the part’s weight and physical properties. The generation of infill is accomplished using a slicer program, which translates a 3D model into instructions for the 3D printer.
With the understanding of the significance of infill in 3D printing, it’s important to recognize that learning infill poses several challenges for beginners. These challenges involve comprehending various patterns, selecting appropriate density, managing overhangs, minimizing imperfections, optimizing print settings, and gaining practical experience. By delving into these intricacies, we can develop the necessary skills to overcome these challenges and achieve optimal results with infill. Through this article, we aim to provide you with essential foundational information that will help you navigate the intricacies of infill and empower you to create successful 3D prints.
Infill Density – What is it?
Infill density refers to the “fullness” of the interior of a printed part and is typically specified as a percentage ranging from 0% to 100%. A lower density creates a more hollow part, reducing weight and material consumption but potentially sacrificing strength. On the other hand, a higher density results in a solid interior, increasing the weight and strength of the part. The choice of infill density depends on the specific requirements of the print. For standard prints that don’t require exceptional strength, a density of 15-50% is recommended. This range balances print time, material consumption, and strength. For functional prints that require extra strength, a higher infill density of more than 50% is advisable, with 100% being the maximum. However, higher densities increase print time and material usage.
In the case of figurines and models intended for display purposes only, an infill density of 0-15% is sufficient. This allows for quicker prints and reduces material consumption while sacrificing some strength. When printing flexible materials like TPU, any density can be used, but higher densities will result in less flexibility.
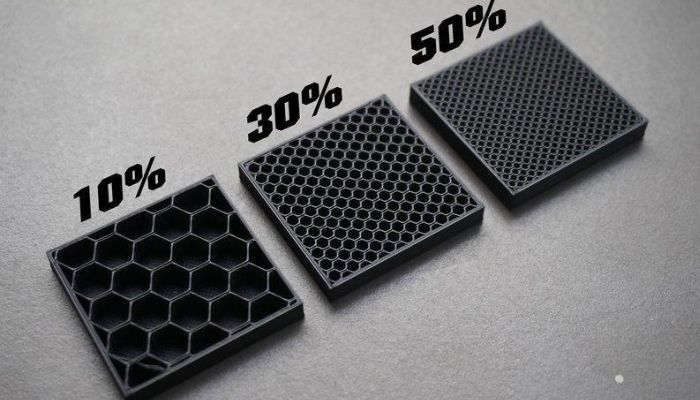
Infills of varying densities (photo credit: Triplaxis)
Exploring Infill Patterns and Applications for 3D Printing
In addition to infill density, the choice of pattern also impacts the properties of the printed part. Different slicer programs offer a variety of patterns, ranging from simple lines to complex geometric shapes. Each pattern has its own characteristics, affecting strength, print time, weight load, and flexibility.
Lines
This pattern consists of lines printed in one direction, providing strength in two dimensions. It is suitable for quick prints, consumes less material, and keeps the weight relatively light.
Honeycomb
The honeycomb pattern creates a visually appealing structure resembling a honeycomb. It offers moderate strength and is suitable for semi-fast prints while conserving material. Honeycomb infill is often preferred when weight reduction is a priority, making it suitable for aerospace or lightweight applications.
Grid
Similar to lines, the grid pattern consists of two-dimensional lines printed every layer, providing two-dimensional strength. It offers a balance between strength, material usage, and print time. Grid infill is versatile and commonly used when a moderate level of structural support is required.
Triangles
The triangles pattern features overlapping triangular lines, providing strength in two dimensions within the XY plane. It is suitable for prints that require strength.
Tri-hexagon
This pattern combines lines going in three directions in the XY plane, creating hexagonal patterns with triangles in between. It offers strength in two dimensions and is suitable for strong prints.
Cubic
The cubic pattern consists of stacked cubes tilted by 45 degrees around the X- and Y-axes, appearing like triangles. It provides excellent strength in three dimensions.
Octet
The octet pattern is similar to the cubic pattern but materializes as squares instead of triangles. It offers three-dimensional strength and is visually appealing.
Gyroid
The gyroid pattern is visually striking, featuring irregular concave curvatures that intersect. It strikes a balance between strength, material usage, and print time. The gyroid infill is advantageous when structural integrity is crucial, as it offers enhanced load-bearing capabilities and reduces the risk of delamination.
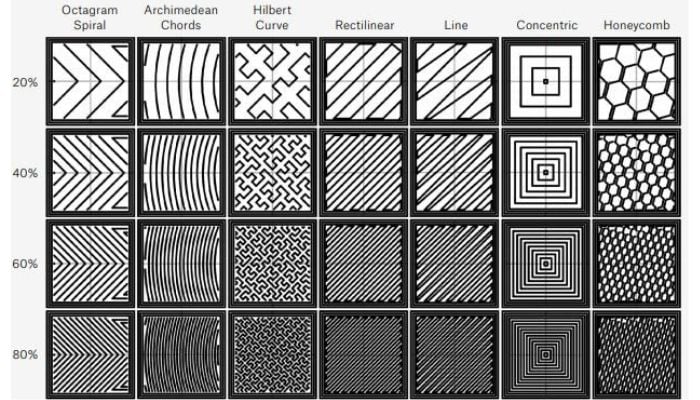
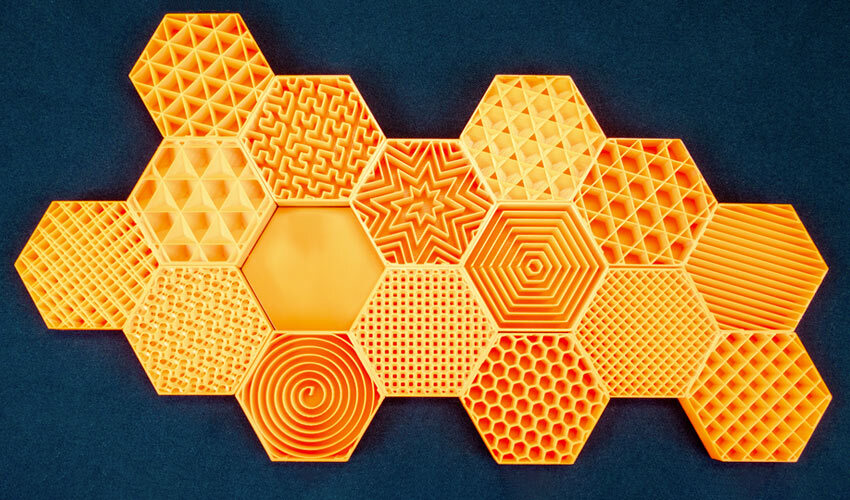
Photo credits: B&C Digital Fabrication Solution
When deciding on the appropriate infill pattern, it’s important to consider the unique advantages of each pattern in terms of strength, weight, print time, flexibility, and buoyancy. Standard prints typically benefit from grid or triangle patterns, while functional prints can take advantage of patterns like cubic, gyroid, or octet. Infill patterns such as gyroid or concentric are ideal for objects that require high strength or load-bearing capabilities, offering enhanced structural integrity. On the other hand, honeycomb infill excels in weight reduction, providing efficient material usage and lightweight characteristics. Line patterns are commonly used for figurines and model prints to expedite the printing process, while concentric patterns shine when it comes to flexible prints, delivering strength with minimal material consumption. For general-purpose prints that seek a balance between strength, speed, and material usage, the grid infill pattern often emerges as a fitting choice.
UltiMaker’s Lightning Infill: An Intuitive Approach
Lightning infill, a new infill option, is the first intelligent infill natively integrated into a slicer, available as an open-source option provided by UltiMaker Cura, and introduces a unique approach to 3D printing by dynamically generating internal supports based on the model’s geometry. Unlike traditional patterns, lightning infill reduces filament usage and printing time by maintaining a partially hollow structure while providing reinforcement primarily to the roof of the model. Although not designed for strength or load-bearing applications, lightning infill offers significant advantages in terms of filament efficiency and rapid prototyping for ornamental or visually appealing prints. While other infill patterns are recommended for functional or stress-bearing parts, lightning infill proves valuable for scenarios that prioritize reduced material consumption and faster printing.
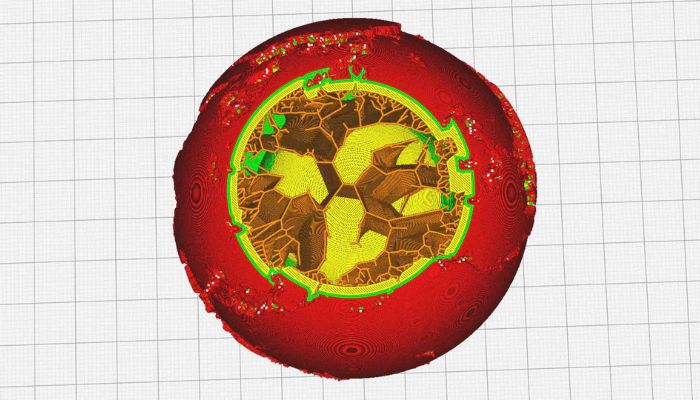
A demonstration of lightning infill (Photo credit: Ultimaker)
Unlocking Strength, Versatility, and Precision in 3D Printing
Infill is essential for creating structurally sound parts when it comes to additive manufacturing. It not only improves the physical characteristics of the part but also provides support and connectivity between print areas in complex shapes. While it’s possible to print without infill or with reduced infill for simple shapes, it is generally necessary for standard and functional parts. It ensures the strength, structure, and weight distribution of the printed object.
To achieve a uniform finish and avoid visible marks on the model’s surface caused by infill, several adjustments can be made. The wall thickness is a critical factor, as thin walls may result in marks, especially at the top areas of the model. Increasing the wall thickness or the number of top and bottom layers can help mitigate this issue. The overlap percentage determines the quantity of infill printed over the model’s perimeter, affecting the wall’s resistance. Adjusting overlap can reduce marks, with an optimal value of around 10%. The printing order, specifically enabling “Infill Before Walls,” can improve the surface quality of overhangs but may leave small marks on the side surfaces of the piece.
Understanding the relationship between infill density, infill pattern, and other printing parameters allows 3D printing enthusiasts and professionals to optimize their prints for specific requirements. By carefully selecting the appropriate infill settings, you can achieve the desired strength, weight, structure, and other properties in your 3D printed parts.
What do you think about Infill? Let us know in a comment below or on our LinkedIn, Facebook, and Twitter pages! Don’t forget to sign up for our free weekly Newsletter here, the latest 3D printing news straight to your inbox! You can also find all our videos on our YouTube channel.
*Cover photo credit: Prusa


