The Benefits of Home Assistant for Controlling Your 3D Printer
A century ago, few could have imagined a world where you can unlock your front door with a smartphone or ask Alexa or Siri to play music and control the lights. Today, these technologies are part of everyday life, ushering in an era of remote control and smart convenience. 3D printing is no exception. That’s why we’re introducing Home Assistant for 3D printers, powered by OctoPrint, that allows users to seamlessly monitor, manage and optimize prints directly from their connected devices.
Home Assistant is an open-source home automation platform for controlling and monitoring various systems in the home or office. This includes lights, electronics, heating, locking doors and more! By adding the OctoPrint integration, users can also synchronize their 3D printer. This way, the printer and all its functions can be controlled over a centralized network.
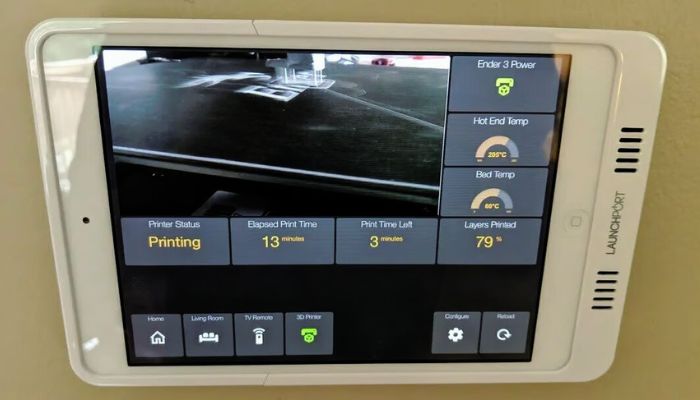
An installed Home Assistant monitoring a 3D printer (Credits: Reddit)
Advantages of Linking Home Assistant to a 3D Printer
The greatest advantage to using Home Assistant for our 3D printer is being able to use the 3D printer remotely. But what exactly can it do? In addition to monitoring basic printer functions, it provides real-time data, offering printing status, the time it will take to complete the process, and even the percentage of work completed. It is also possible to connect a camera to the 3D printer for live video monitoring.
Additionally, users can interact with their 3D printer through Home Assistant, including starting or pausing prints. If users decide to make a series of small configurations in Home Assistant, the range of remote control possibilities expands, with the ability to preheat the print bed and extruder, and more.
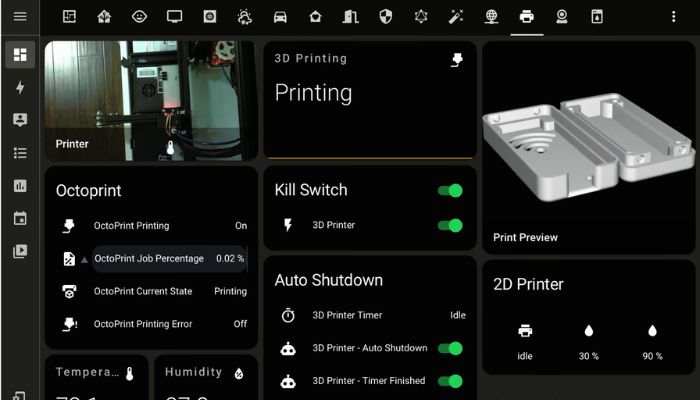
An example of a visualization while a 3D printer is working (Credits: Harshit’s Blog)
Integrating Your 3D Printer
The first essential step to link a 3D printer to Home Assistant is to download and configure OctoPrint. This software will link the machine to the device. Once OctoPrint is connected to the printer, it will appear as a new device to add in the main menu. When the link is accepted through OctoPrint, the printer will be linked to Home Assistant.
Next, it’s time to integrate the printer into Home Assistant. This integration can be done in two ways. The first, more basic and limited in functions, is called native configuration. This configuration type doesn’t require technical knowledge and is an intuitive process. There is a more advanced configuration, the MQTT plugin, which must be installed in OctoPrint. Although it’s more difficult to configure than the native plugin, it offers more features for your 3D printer and is highly customizable. Among these features is access to a camera for remote monitoring.
To integrate your 3D printer into Home Assistant, you only need three things: a computer or Raspberry Pi, a 3D printer connected to OctoPrint, and a Home Assistant installation. Once you have these three components, you can connect your 3D printer to this device using either of the two methods we’ve specified: native or MQTT configuration. To discover OctoPrint for Home Assistant, click HERE.
What do you think of using Home Assistant to manage 3D printers? Let us know in a comment below or on our LinkedIn or Facebook pages! Plus, don’t forget to sign up for our free weekly Newsletter to get the latest 3D printing news straight to your inbox. You can also find all our videos on our YouTube channel.
*Cover Photo Credit: Home Assistant