


Stringing in 3D Printing: What Is It and How Do You Fix It?
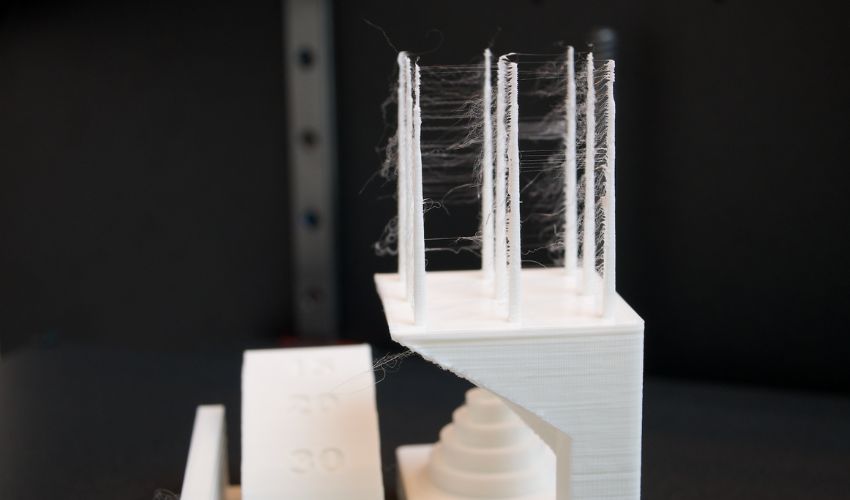
When it comes to 3D printing, as with any manufacturing process, it goes without saying that users will not always be completely satisfied with the results. It can often happen that, due to different circumstances, the 3D printed part does not quite meet expectations and may therefore not be usable. One of these problems is what is known as stringing in 3D printing. As the name already suggests, stringing results in extremely thin, unintentional plastic threads on the part, reminiscent of a spider’s web. These unsightly strings are a common 3D printing issue. Moreover, currently there are no machine applications that can be used to remove these threads, so this must be done by hand or alternatively with heat. Add on to that the fact that these threads can occur in large quantities, depending on the part, it is safe to say that the removal process can be quite complicated. We have looked more closely at stringing during 3D printing and explain how it occurs and what you can do about it.
The use of 3D printers thrives on almost daily innovations, so it is often unavoidable that challenges can also arise in connection with this. Stringing basically occurs when using filaments, essentially the strings are fine, melted filament threads that settle in places other than they are supposed to be on the 3D printed object. This can usually happen due to incorrect settings, so that the filament continues to drip out of the nozzle even though the extruder is about to move to another location to continue FDM 3D printing.
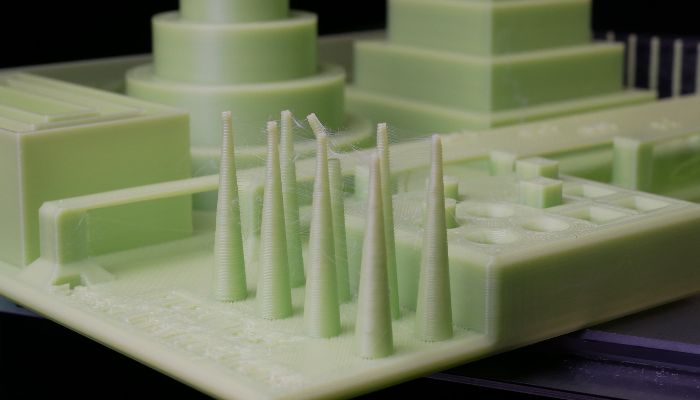
Photo Credits: Elliot Saldukaite/3Dnatives
Here’s how you can visualize the process: If you’ve ever used a hot glue gun, you’ve probably noticed that even after you stop squeezing the hot glue gun, it still creates more melted glue. This is because there is too much pressure inside the gun. We can also apply this to the effect of stringing in 3D printing: a filament with a size of 1.75 mm, for example, and a nozzle with a size of 0.4 mm – here, too, there is pressure that causes the filament to flow further out of the nozzle resulting in these threads. Theoretically, of course, this shouldn’t happen, but there are a few things you can keep in mind to ensure that the melted filament is really only applied to those parts of the print where you really want them to be.
What Can You Do About Stringing in 3D Printing?
To avoid having to deal with stringing when 3D printing, there are a few things you can adjust before printing to ultimately avoid those pesky strings. Starting with probably the most obvious point: temperature. We know that the more filaments are heated, the more fluid they are. And the more liquid they are, the more likely they are to drip out of the nozzle during printing. Now, on the flip side, if the temperature is too low, it can’t melt the filament sufficiently, which limits the overall 3D printing process. So you have to find the perfect middle ground that takes into account both the temperatures recommended by the manufacturer and the other print settings. In general, the following temperatures apply to the most commonly used filaments: PLA – 180-210 °C; ABS – 210-250 °C; PETG – 210-230 °C; PVA – 160-190 °C and TPU – 220-240 °C. However, it is also recommended to monitor the overall stringing situation during 3D printing and act accordingly, reducing the temperature in small increments when stringing occurs.
Another point that can possibly help you to eliminate stringing in 3D printing is adjusting the movement speed. If we assume that the movement speed is set too slow, i.e. that the extruder nozzle needs too much time to get from point A to point B, then stringing can also occur. However, if we change the settings so that the printing process is faster, the heated filament has less time to string because the extruder nozzle moves faster. Which movement speed is best here, of course, depends to a certain extent on the 3D printer itself, but it should also be ensured that the movement speed is not too high and at the same time the temperature is not set too low, because this would lead to under-extrusion. Another solution is that there are actually some slicers that offer the function that while the extruder moves over areas that are not to be printed, the speed is increased.

Photo Credits: Prusa
Probably the easiest way to solve stringing centers on retraction. Active retraction simply means that when the extruder travels a path on which no pressure is applied, the filament retracts a little during this time so that no dripping occurs. Once the extruder reaches the point where 3D printing is to continue, the filament is pushed out again. To take up the example of the hot glue gun again: Imagine that as soon as the gluing process is to be interrupted, you pull back the glue stick by hand, thus avoiding the pulling of threads. It is probably advantageous for you to know that the retraction is usually already activated with slicers.
Also, in regards to the maintenance of the nozzle and the filament itself, there are some things that can help you. On the one hand, you should always be sure that the nozzle of your 3D printer is clean. If there are material residues in the nozzle, there is a greater risk that pieces of filament will subsequently be deposited on these residues, which means that unhindered 3D printing cannot take place and threads can form. The nozzle should also be inspected in any case so that it can be ensured that it is not damaged. As far as the filament is concerned, it is important to point out that it is dry, because if it is used for printing in a moist state, the bubbles created due to the moisture can burst during the printing process and escape from the nozzle unchecked, which can ultimately lead to stringing.
Now that we have gotten an overview of possible reasons and how to fix them, it is still important to mention how you can get rid of the thin filament threads once they have been printed. Since – as we have already mentioned – there is no automated solution for removing the filaments, unfortunately you probably have no choice but to remove them manually. For this, depending on the complexity of the part, a careful approach with your bare fingers is recommended. Since stringing involves very thin threads, they can correspondingly also be easily removed with the hands.
Have you struggled with stringing? Let us know in a comment below or on our LinkedIn, Facebook, and Twitter pages! Don’t forget to sign up for our free weekly Newsletter here, the latest 3D printing news straight to your inbox! You can also find all our videos on our YouTube channel.
*Cover Photo Credits: Elliot Saldukaite/ 3Dnatives


