


Bridging in 3D Printing: Everything You Need to Know
Using a 3D printer, whether for professional or hobbyist purposes, can be an exciting journey filled with surprises. However, not all surprises are positive; some may present challenges. We have previously discussed common printing issues like stringing, ghosting, and warping, providing tips to overcome them. Today, we want to shed light on another potential challenge in FDM/FFF 3D printing: bridging. When you hear the term “bridging,” you might think of a bridge, and you’re absolutely correct! In simple terms, bridging refers to extruding plastic between two points in an empty space or gap. However, it often results in undesirable extrusions that sag and deviate from the intended straight line, leading to poor bridging. Let’s explore how to address this issue effectively.
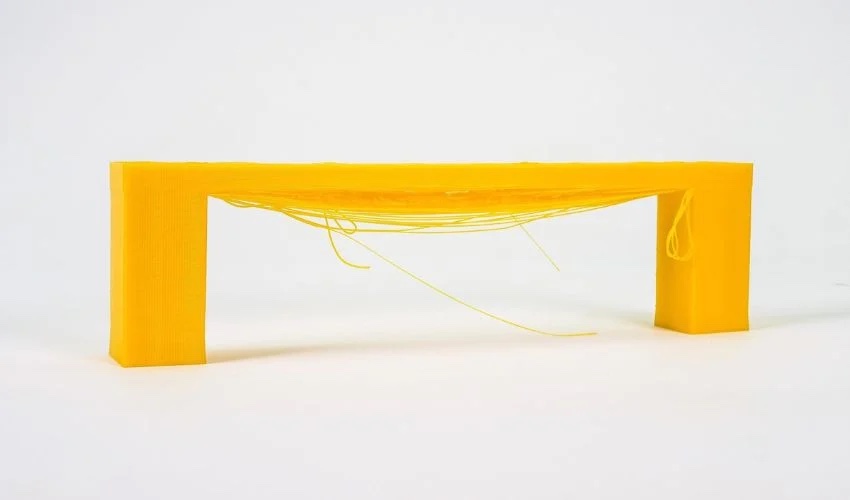
You may have come across the comparison of FDM 3D printing as a hot glue gun on a robotic arm. Visualizing the issue of poor bridging in FDM 3D printing can be done by imagining operating a hot glue gun while pulling the trigger. Even if the first dot of glue makes contact with a surface, the subsequent glue will likely drip down in the air. Bridging in FDM is somewhat similar; when attempting to apply material in the air between two points, it tends to sag and not maintain a perfectly horizontal position. This article delves into why this bridge-like structure often fails and provides specific insights on how to address it effectively.

Why your overhang or bridge doesn’t succeed in 3D printing can depend on several factors (photo credit: N3DTech via Prusa Forum).
Temperature, Material and Printing Speed Are Decisive Factors
Certainly, like any challenge in 3D printing, there are specific reasons why poor bridging can occur. Drawing from the earlier analogy of the hot glue gun, we can identify some clues that contribute to this problem. One key property is the temperature of the material. Just as with the hot glue gun, if we attempt to use liquid adhesive as a bridge between two points (A and B), the extreme temperature makes it challenging to achieve the desired result. Similarly, in 3D printing, improper filament heating can lead to issues. If the filament is heated excessively, it becomes highly viscous, causing it to drip excessively and resulting in significant bridging problems. Conversely, insufficient heating leads to low filament viscosity, causing it to sag due to gravity.
In 3D printing, the right filament and temperature play a crucial role in bridging success. Different filaments exhibit varying behaviors, so it is essential to choose materials suited for bridging. PLA, for instance, can be a suitable choice since it can be printed at lower temperatures and solidifies quickly. However, using PLA requires printing with an open pressure chamber to manage its viscosity effectively. Being mindful of the filament properties and optimizing the printing conditions will greatly improve bridging results in your 3D prints.
Furthermore, similar to other 3D printing errors, bridging can also be influenced by print speed, potentially leading to misprints. If the print speed is set too high, the material may not have sufficient time to extrude properly, so it is advisable to proceed cautiously with the print speed. Due to the distinct properties of various filaments, experimenting with the printing speed for bridging is highly recommended. This involves gradually reducing the printing speed in small increments until an optimal speed is achieved. However, it is essential to strike the right balance, as printing too slowly may result in insufficient layer adhesion and an unsolidified 3D printed part.
To fine-tune the printing process for bridges, it’s crucial to adjust the Slicer’s Bridge Fan Speed setting. This allows you to control the speed specifically for the bridge-like sections of your model. Depending on the slicer software you are using, you can find this setting in different locations: in PrusaSlicer under Filament Settings > Cooling > Bridges Fan Speed, in Cura under Print Settings > Experimental > Bridge Fan Speed, and in Simplify 3D under FFF Settings > Cooling > Fan Overrides > Bridging Fan Speed Override. Moreover, the orientation of your model also plays a significant role in successful bridging. By making a few adjustments, you can rotate the model to minimize the number of bridges, optimizing the printing process for better results.
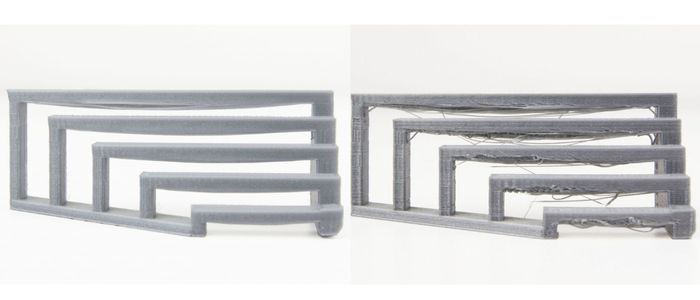
Poor bridging can manifest itself in several stages (Photo credit: UltiMaker)
Why 3D Printer Ventilation Is Recommended When Bridging
As previously discussed, controlling the material temperature is crucial for successful 3D printing, but the ventilation of your 3D printer is also a significant factor, especially when it comes to bridging. Ventilation plays a key role in cooling down the printed material effectively. Using a fan within the build space helps to reduce the temperature after the filament has been heated and applied. By activating the fan, the filament cools down faster, leading to quicker hardening and reducing the likelihood of deformation and dripping. It’s essential to ensure that your print is adequately positioned to benefit directly from the cooling effect of the fan.
If the previous adjustments fail to yield the desired results, there are alternative approaches to consider. In the context of FDM 3D printing, certain geometries may require support structures to stabilize overhanging components that are not self-supporting. Implementing such supports can help maintain the integrity of bridge-like shapes as the extruder moves over these unsupported areas. Depending on your 3D printer, you have the option to use support material made from the same material as the printed object or opt for a material specifically designed for support that dissolves upon contact with water.
Another factor to experiment with is the infill settings. For instance, using a higher infill percentage, like 80%, will result in smaller empty spaces and thus more robust internal bridging. Conversely, a lower infill percentage, such as 5%, will create larger empty spaces, increasing the risk of unstable bridges. Therefore, adjusting the infill percentage can significantly impact the quality and stability of your 3D printed bridges.
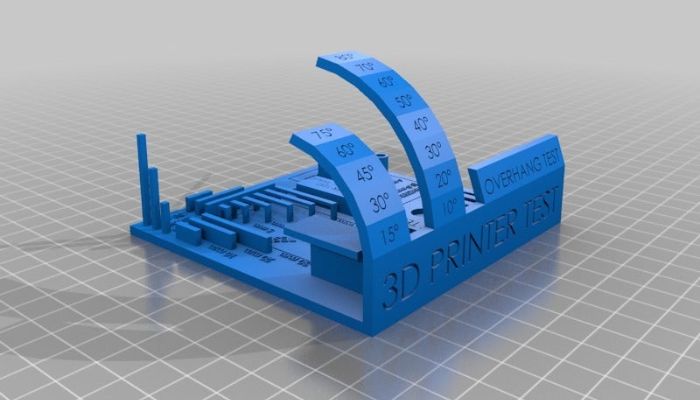
The angle of your overhang can have a negative impact on 3D printing (Photo credit: Faultydata via Cults)
After exploring various tips and recommendations for achieving successful 3D printing with overhangs, it is essential to acknowledge that the most suitable solution is always influenced by the specific design of the model, the chosen material, and the 3D printer used.
Have you ever experienced problems with bridging in 3D printing? Let us know in a comment below or on our LinkedIn, Facebook, and Twitter pages! Don’t forget to sign up for our free weekly Newsletter here, the latest 3D printing news straight to your inbox! You can also find all our videos on our YouTube channel.


