


Cleaning: A Key Step in 3D Printing Post-Processing
After a quick overview of post-processing in 3D printing, it’s time go even deeper into the topic, starting with one of the first steps that takes place immediately after printing. This is the cleaning of the part, which involves both the removal of printing supports and the removal of any excess material. And obviously, this cleaning step can take several forms depending on the additive manufacturing technology or the material used, among other considerations. For example, we can point to depowdering for powder bed processes or rinsing for resin technologies. Let’s take a closer look at these different methods in order to understand the possible difficulties that may be encountered during post-processing cleaning.
Whatever the 3D printing process, it is often necessary to go through post-processing steps once the 3D printer has finished its work. Removal of any supports, dewaxing, heat treatment, surface finishing, painting, etc. Often considered time-consuming, post-processing tends to be increasingly automated, with more and more solutions providing this role today. Cleaning is undoubtedly one of the steps in post-processing that still takes too much time, with pitfalls that are difficult to overcome.
Cover Photos: Matterhackers
Removing Excess Material
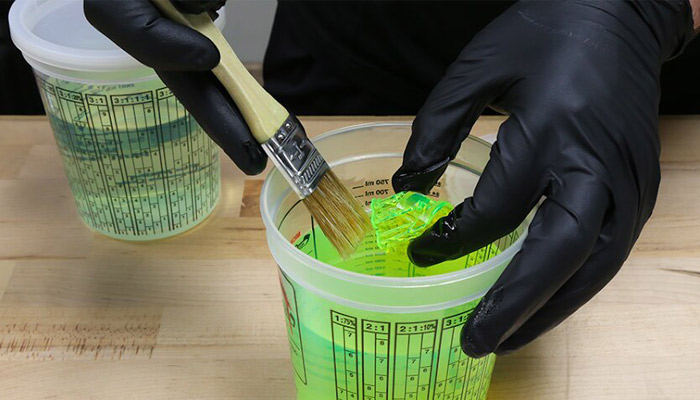
Remove Uncured Resin
In resin processes, once the 3D printing is finished, it is necessary to go through cleaning afterwards to remove the excess material that could not be photopolymerized so that it does not solidify on the top of the model. This is what we call rinsing. This is a sensitive step because it can affect the part that has already been cured. In order to facilitate this step, several machines are available on the market: in essence they are tanks in which the user can place their parts. Moreover, resin 3D printer manufacturers often offer their own equipment, such as the Form Wash from Formlabs. Cleaning your part will usually involve the use of chemicals such as isopropyl alcohol (IPA) or tripropylene glycol monomethyl ether (TPM). Be aware of operator safety here: recommended protective equipment must be worn.
Depowdering, an Essential Post-Processing Step
Additive manufacturing processes that use powder will require a post-processing step called depowdering. This (as the name suggests) involves the removal of the excess powder that surrounds the part after printing. The importance of this step can differ depending on the technology: in SLS for example, the printed parts are encapsulated in what is called the “print cake”. After having let the powder tray cool down long enough depending on the polymer used, the user will have to remove the powder to get the parts. This step can be manual, though please note that in this case it will be necessary for the user to be equipped with gloves and a mask in order to not to inhale the powder particles. Note that today, most SLS machines offer dedicated powder recovery stations, facilitating this work of aspiration, but especially recycling of the unsintered material. Indeed, it is possible to recover this powder and to mix it with “new” powder for the next print.
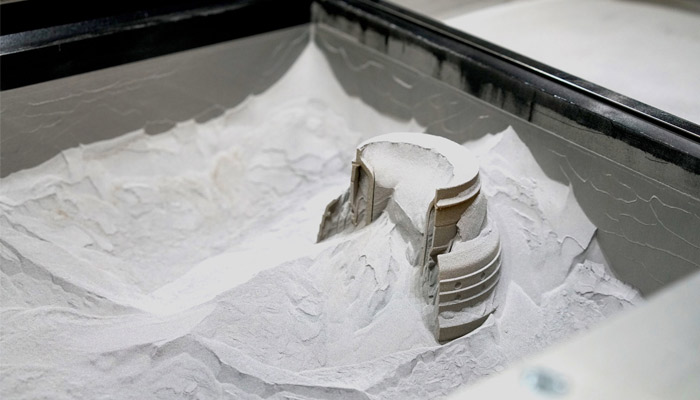
Photo Credits: 3D Logics
Once the parts have been recovered, we refine the depowdering process by using a brush to remove the excess unsintered material. However, if manufacturing volumes are larger, we advise you to invest in a depowdering solution that will allow you to automate this step and to devote your time to another task, but especially to go and find areas that are much more difficult to access (depending on the geometry of your parts). Several types of machines currently exist using different technologies. Though one of the most common is sandblasting. Depending on your budget but also on the constraints of your working environment, you will have access to more or less adapted and efficient solutions. Some sandblasters integrate a rotating drum and a compressed air gun; others are simply equipped with a vacuum cleaner and a sandblasting cabin.
In addition, by using automated de-soldering solutions, the operator can avoid several pitfalls. Indeed, cleaning the parts by hand can have some consequences such as irregularities in the depowdering, the appearance of fingerprints on the part or even burns related to a too long or too close exposure to the pressure.
Removal of Printing Supports
Once we have a cleaned part, with no excess material, we can then remove its the supports, if used. Note that these steps do not apply to polymer powder bed solutions (SLS, MJF, SAF) since the powder already acts as a support. Moreover, depending on the printing process chosen and the geometry of the part, you can go straight to this post-processing step, without prior cleaning of your part – for example when using FDM.
Most often essential – for example, to support cantilevered areas – print supports still raise the question of “What’s next?” Once the part is out of the machine, they will have to be removed, a step that can be difficult. Indeed, several methods of removal of the supports exist today, related to the complexity of the part, the material used or what is available to the user. Let’s start with the manual removal of these supports: this can be done directly with your fingers (if the supports are easy to remove and few in number), or with the help of tools such as cutting pliers or a small knife or cutter. We are talking here about polymers supports. Also, do not forget that it is necessary to cut each point of contact. It is a meticulous work because there is a risk of damaging the final part.
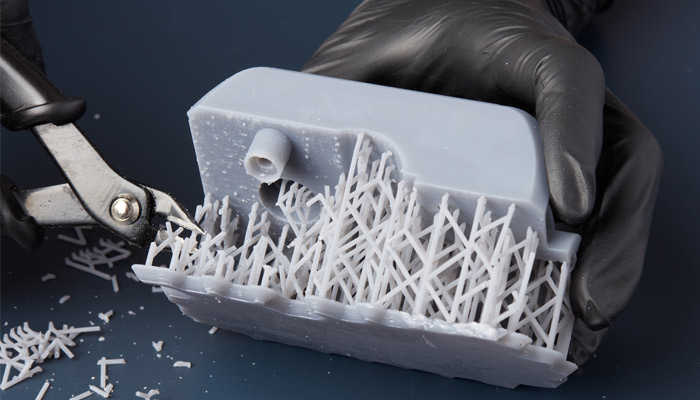
The use of cutting pliers is common to remove print supports (photo credits: Formlabs)
If you used soluble printing supports, a second technique consists in immersing your part in water or in a chemical solution (if it is HIPS, we will prefer limonene for example whereas PVA dissolves in water). You should know that there are machines dedicated to the removal of plastic supports that will automate this step and offer ultra precise results.
Finally, for metal 3D printing media, CNC machines such as a milling machine will mostly be required. It is also possible to use techniques such as wire cutting.
And you, what cleaning method do you use to ensure the post-processing of your part? Let us know in a comment below or on our LinkedIn, Facebook, and Twitter pages! Don’t forget to sign up for our free weekly Newsletter here, the latest 3D printing news straight to your inbox! You can also find all our videos on our YouTube channel.
*Cover Photo Credits: Spengler


Totally agree for SLS-MJF, Norblast sandblasting solutions for AM powder technology are perfect for this job.
Thanks for all the publication 3D Natives made!
I wholeheartedly agree that Norblast’s sandblasting solutions for AM powder technology are ideal for this work using SLS-MJF.
The majority of the time, CNC machinery such as a milling machine will be necessary. Cutting wire is one option among many others that might be used in this context.
I believe your blog is a good website that can help anyone learn new things
Your blog, in my opinion, is a useful website that can teach anyone new things.
Just as MapQuest guides travelers through complex routes, this article navigates the intricate process of 3D printing post-processing. It highlights the importance of cleaning steps like depowdering and resin rinsing to ensure high-quality prints. Both emphasize the value of a clear path—be it on the road or in manufacturing.
This article offers a great overview of post-processing techniques for 3D printed parts. The explanation of various methods, from dissolving supports to CNC milling, is clear and concise. Thank you for the helpful insights! Papa’s Freezeria. Perhaps adding a section on vapor smoothing for certain filaments would further enhance the piece, as well as mentioning specific brands of support removal solutions.
oh so good, thanks u
I once spent nearly 2 hours just cleaning a small SLA printed part because of excess resin stuck in the small grooves. Alcohol was not enough, had to dip it in ultrasound and use a soft brush. Then had to learn how to design better support to save cleaning effort.
Sportzfy best sports streaming app is trusted by fans for reliable and HD live matches.
Once the parts have been recovered, we refine the depowdering process by using a brush to remove the excess unsintered material
Let’s remember to take breaks and enjoy life outside of gaming too! Balance is key, and we can have the best of both worlds!
This is the cleaning of the part, which involves both the removal of printing supports and the removal of any excess material.
I recently discovered a very useful mouse testing website that can check the condition of your mouse scroll wheel through scrolling tests. If you want to see whether your mouse is damaged, you can try Scroll Test.
After printing, removing excess material is crucial, but what methods are most effective for delicate parts to avoid damage during the cleaning process?
That’s a really insightful overview of support removal! I’ve mostly worked with simpler FDM prints and found water-soluble supports a game-changer. For more intricate stuff, though, I can see the appeal of automated solutions. Speaking of intricate designs, it reminds me of the levels people create in Geometry Dash – the detail some achieve with simple shapes is amazing! Have you guys tried building anything cool in that? It’s a fun outlet for creativity, even if it’s just pixel art.
Once the parts have been recovered, we refine the depowdering process by using a brush to remove the excess unsintered material
I completely agree! Cleaning 3D prints can be surprisingly time-consuming and tricky. I recently spent ages removing supports from a complex resin print, and it felt like forever. Speaking of testing patience, I stumbled upon a cool website called Cps Test the other day. It’s a fun way to see how quickly you can click – maybe a good distraction while waiting for those prints to finish! It might help you track your progress on clicking that support material off!
Experience interactive gaming and responsive performance using Fantasy Gems Entertainment App.
Enjoy a platform designed to deliver smooth access and enjoyable online entertainment.