


3Dnatives Lab: Testing the Go!SCAN 3D scanner from Creaform

Founded in 2002 in Quebec, Creaform is one of the pioneering manufacturers of metrology solutions. Acquired in 2012 by AMETEK Inc., a leading group in measuring instruments, over the years the company has developed several professional 3D scanners for industries like automotive, aerospace, consumer goods and healthcare. Currently, the manufacturer offers 3 families of portable scanners: The Go!SCAN 3D, an entry-level model, the HandySCAN 3D, the latest generation of the brand’s historical model, and the MetraSCAN 3D, an optical CMM 3D scanner.
To find out more about the manufacturer’s technology, we tested the Go!SCAN 3D scanner in our lab. With the Go!SCAN 3D, the manufacturer is focusing on 3 features: scanning speed, ease of use, and measurement quality. Additionally, this model is the manufacturer’s most affordable scanner, starting at a price of €34,500. This still represents an important investment but relatively in-line with prices of other 3D scanning equipment for professionals.
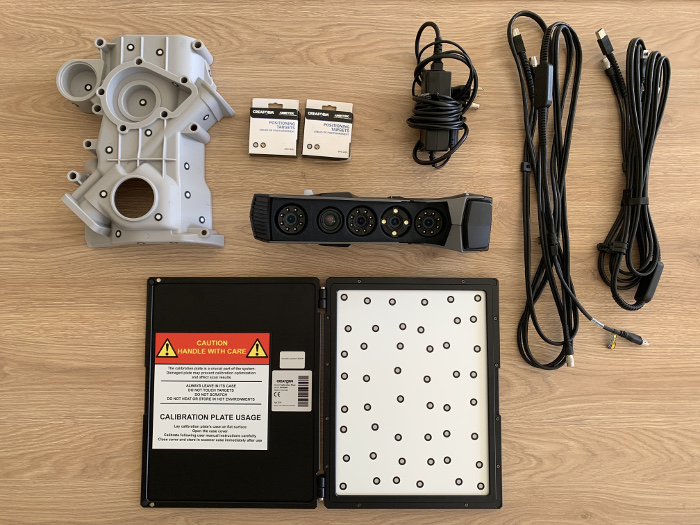
Included with the Go!SCAN 3D is a USB 3.0 cable, power supply, calibration plate, positioning targets and a scan test piece.
So, did the 3D scanner meet expectations? Is the handling of a professional scanner such as the Go!SCAN 3D easy to figure out? Does the price match the equipment? What level of accuracy can be achieved? What type of parts can be scanned? Find below the complete test of Creaform’s 3D scanner!
1. Unpacking the Go!SCAN 3D
First things first, Creaform delivers the Go!SCAN 3D in a reinforced case to protect against any shocks during travel. Inside the case, we find the 3D scanner, power cables, a USB 3.0 cable, positioning targets and a calibration plate. In addition, the manufacturer supplies a test piece to be scanned (in this case, an engine crankcase). The connectors are a reminder that this is indeed a portable but wired 3D scanner, which means you need to keep the computer and a power outlet at a close distance, which can be tricky for any outdoors scanning. To give you an idea, the Go!SCAN 3D’s cables are long enough to go around a small vehicle.
Given that the Go!SCAN 3D is a portable and handheld device, its size and ergonomics are important criteria. The scanner weighs 1.25 kg (2.7 lbs) and measures 89 x 114 x 346 mm (1.5 x 2.7 lbs), the scanner is not only easy to handle, but can also be securely fastened by a hand strap, which also means you can spend several minutes scanning an object without getting tired. Aesthetically, the scanner offers a resolutely modern and neat design, which has won it the 2019 Red Dot Awards for Product Design.
You find on the sides of the Go!SCAN a system of luminous indicators (green, blue, orange or red) that allow you to check live if the object has been properly digitized or not. Additional buttons allow you to control scanning from the device itself and not the computer (via a system of short, long repeated clicks). The Smart Control option will offer additional functions such as calibration or the ability to change the on-screen display.
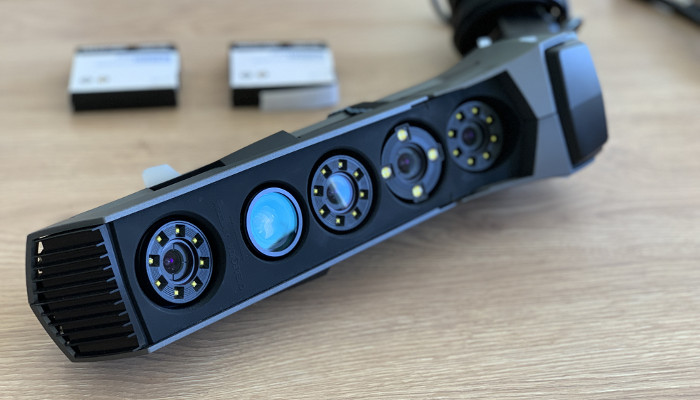
The Go!SCAN 3D includes a white light projector, 3 cameras for data acquisition and a dedicated colour camera.
The Go!SCAN 3D is based on a structured light technology. This means that a light projector projects 99 white lines onto the object to be digitized, while the 3 tracking cameras acquire data to construct the surface at a rate of 1.5 million measurements per second, and an additional camera captures the colour data. The tracking cameras also allow the scanner to position itself in space in real time, which allows the computer to know where the scanner is in relation to the object at all times.
2. Installation of Creaform’s 3D scanner
To start the GO!SCAN 3D, it is not very complicated as you only need to connect the power and USB 3.0 cables and then install the VXelements software on your PC. Like the vast majority of professional 3D scanners, the GO!SCAN 3D is not compatible with MacOS or Linux operating systems, but only with Windows 7, 8.1 or 10. Moreover, for maximum performance, Creaform recommends the use of a powerful computer, equipped with at least an Intel Core i7 2.6 GHz processor, an NVIDIA Quadro P5200 graphics card, OpenGL 4.5 or more recent, and finally 64GB of RAM (Creaform recommends, for example, the HP Zbook G5 Mobile Workstation available from €4,535).
When installing the scanner, note the possibility of using the Ethernet socket on the computer, not to operate the device, but to secure the connection and prevent the USB cable from being unintentionally disconnected during the scanning phase.
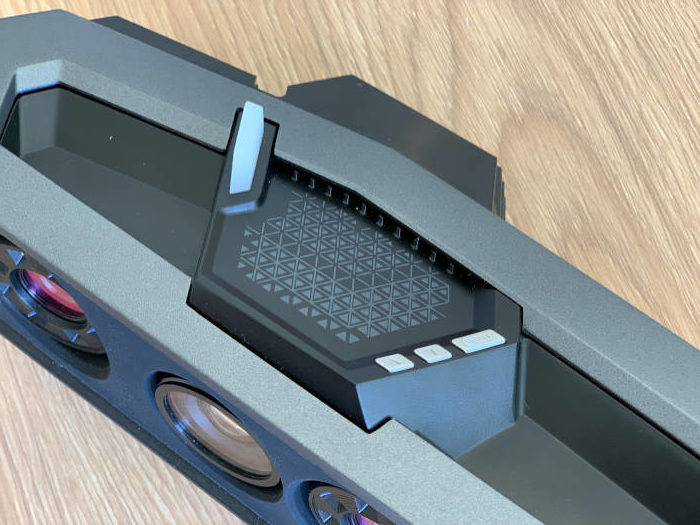
The buttons on the front of the Go!SCAN 3D allow you to start, pause, and zoom in and out of scanning.
Before starting the first scan, a calibration step is necessary. The manufacturer advises to repeat this step every time the ambient temperature changes or if the scanner receives a shock (and more generally before each work session). The operation starts directly from the software or the side buttons. You will have to 3D scan the calibration plate delivered with the scanner by positioning it at different heights and angles at 14 distinct points during the calibration process. This simple operation is carried out in about ten seconds and allows the accuracy of the scans to be refined. Once the calibration has been finalized, scanning can begin.
3. VXelements software
The Go!SCAN 3D comes with VXelements software, compatible with other Creaform 3D scanners. It includes a module dedicated to digitization, simply called VXscan. As with most scanning software, VXscan is an integral part of the scanning phase, which means that a good understanding of the software’s parameters will have a real impact on the final rendering of the scans. For those that would like more guidance, the manufacturer has developed two scanning modes: the classic mode which allows you to control all of the scanner’s parameters, but also a guided mode. A “learning” section also provides direct access to various guides for getting started with the scanner.
Please note that when you purchase the Go!SCAN 3D scanner, the manufacturer offers physics or distance learning courses to help you make the best use of the equipment and master the many parameters available.
To go even further, other paid modules are available within VXelements, such as VXmodel, which integrates various post-processing options to improve the digitized model. It is frustrating that VXmodel is only available as a paid version, as the switch from VXscan to VXmodel is useful to finalize the cleaning or improvement of a scan that has just been made. Another module called VXinspect is used for quality control applications, while the VXtrack module is used to control displacements, drive assembly processes and measure deformations on the model.
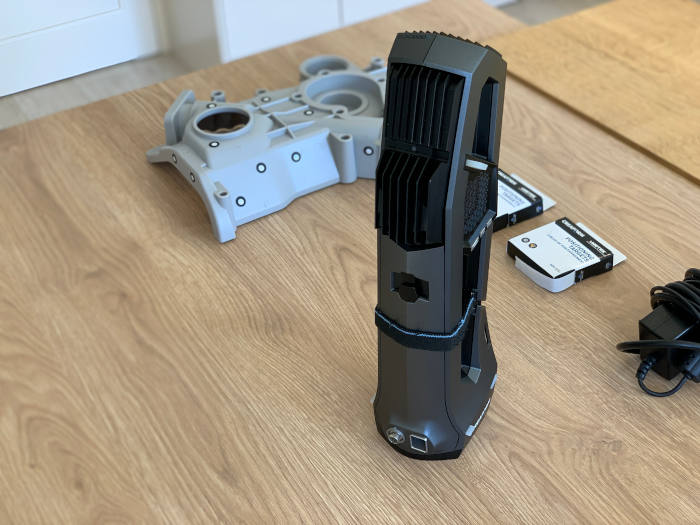
The scanner is easy to handle and is also secured by a hand strap.
4. How does the Go!SCAN 3D?
i. Preparing the scan
There are three steps involved in a scanning session. The first step is a preparation phase and includes the calibration of the scanner (as mentioned above) but also the selection of the scan parameters within VXelements. On the one hand, relatively simple parameters such as the type of object to be scanned, rigid or semi-rigid (human body for example), the resolution according to the desired level of detail (from 0.2mm to 1mm), the acquisition of texture (i.e. the colour, with a resolution of 50 to 200 DPI) or the type of positioning.
The type of positioning is important and tells the scanner what it must use to recognize the object: its geometry, its texture or targets that have previously been positioned on the part. These targets, delivered with the scanner, must be placed on the areas of the part most likely to generate errors, and there must be at least 4 of them. Hybrid positioning will enable all three methods to be used to provide optimal acquisition and avoid losing data when scanning the object.
Other parameters, a little more complex to apprehend, will also inform on the reflexivity of the targets, or on the shutter speed during scanning (a parameter which can be adjusted manually, with the idea that the darker the surface of the object, the longer the shutter delay will have to be). Generally speaking, with all 3D scanners on the market, the more precise, textured and voluminous the scan, the greater the processing time and the size of the export file.
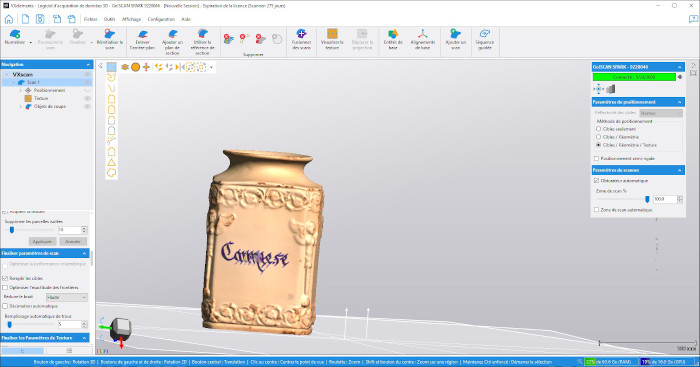
Test scan of a vase – Despite a relatively shiny surface, the rendering is consistent, including edge detail and writing.
ii. Digitization and finalization
The second major step is the actual scanning, i.e. the manual scanning of the part. This can be started from the software or from the buttons on the front panel. The specificity of Go!SCAN 3D is its ability to generate a mesh, meaning a quasi-final rendering, in real time.
Digitization does not pose any particular problems, but the distance between the equipment and the object must be respected (a minimum distance of 25cm to a maximum of 70cm). As explained above, the LEDs on the equipment change colour to inform about the optimal distance. If the LEDs on the scanner are red or yellow, this means that you are too close. If the LEDs are light blue or dark blue, then you are too far away. An optimal distance of the scanner from the part is indicated by the color green. Once the whole part has been scanned, the user has the possibility of modifying the scan by deleting unnecessary data via cutting plans or selection tools (rectangular area, lasso, brush…).
It is also possible for Go!SCAN 3D to lose sight of the model if scan distances are not respected or depending on the characteristics of the object. However, the tracking can be resumed quite easily using some easy methods: either by repositioning the scanner using the last frame displayed on the screen, or by using VXelements’ tracking tool (which prompts you to reposition the scanner to a specific position) or finally by using a previously captured positioning target.
During finalization, again, the user will be able to play with parameters to decide on the quality of the data. The parameters available include the possibility of filling in targets, optimizing boundary or volumetric accuracy, reducing surface noise, automatically filling in holes, or even launching an automatic decimation phase (to reduce the number of triangles and therefore the size of the final file). Once the parameters have been selected, the user can then start the final scan to obtain the 3D file, an operation that can however take a few minutes depending on the size of the part and the desired quality.
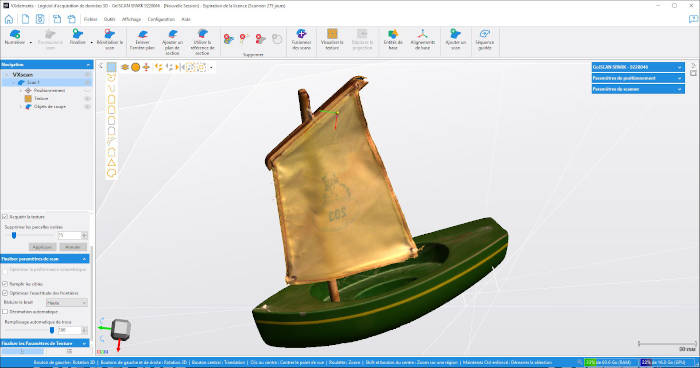
Scanning test of a boat model: the sail and colours are well restored, but we encountered difficulties in scanning the rope (appears invisible here).
iii. Backup and export
The third and last step is to save your session (in CSF format) and export the resulting mesh in. STL or .OBJ format (with associated textures). It will also be possible to save only the positioning targets (.TXT) or the scanning model (.CSP).
Please note that for a better result, but also to limit the RAM space of the computer, it will be interesting to merge several scans together. The “Merge Scans” tool is available in the VXelements toolbar and will allow you to align two (or more) scans automatically or manually in a relatively intuitive way.
VXelements allows to export in the .STL or .OBJ format for 3D printing
5. First digitization
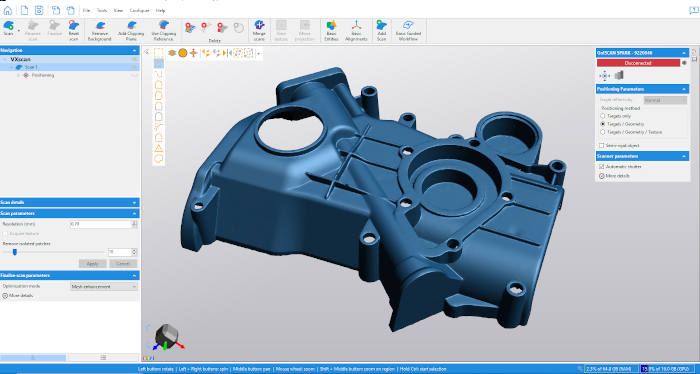
During the scanner test, we wanted to review various models, some with many details, fine edges, strong colour contrasts… for example we scanned a mechanical part (with the casing supplied), an organic model with a 1:1 scale animal replica, a ship model, a sports shoe and a decorative vase.
A common problem with many scanners, especially those based on a structured light process, is scanning reflective, very dark or transparent objects. It is therefore advisable to prepare the object with a matte powder or spray. In this test, we have deliberately chosen to avoid scanning such objects. It is therefore advisable to avoid having shades appear by making sure it is well lit all over.
On the renderings of the available scans, we appreciated the very successful rendering of the textures (the textile of the shoe or the sail of the boat), but also the richness of the colours (of the lobster’s shell for example) or the finesse of certain elements (such as the writing on the vase, the inscription on the sail of the boat or of the lobster’s antennae). However, some elements disappeared, such as the boat’s rope and some details that were smaller than 1mm. Note that we used a fusion of the scans for each model to improve the final rendering and obtain a real 360° scan of the object.
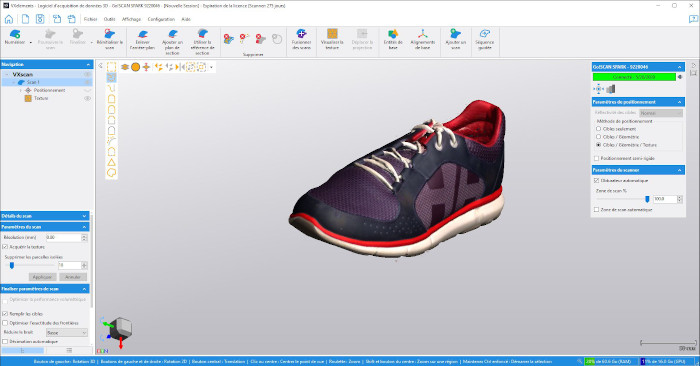
Scan test of a sports shoe – One can only appreciate the faithful rendering of the fabric texture.
Also, and although it is not mandatory according to Creaform, we realized that the scans worked better overall, both in terms of final result and during the acquisition phase, when the targets had been previously added to the object (at least 4 targets). The scanner was able to follow the object much better.
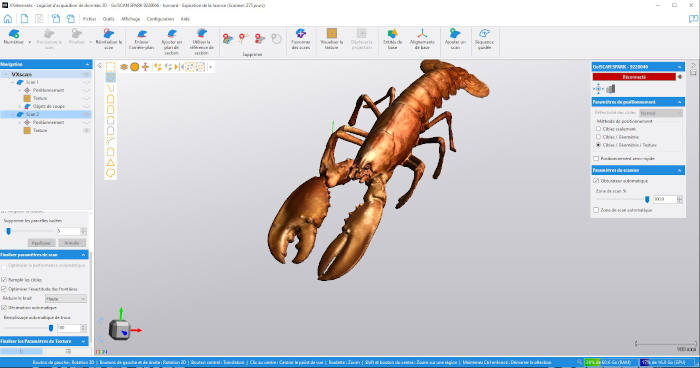
Scanning test of a lobster replica: probably the most successful scan of our tests, with a great rendering thanks to the level of colour richness and the high level of detail
Conclusion
- Quality of Device 8.5/10
- Software 9/10
- Scan Quality 10/10
- Ease of Use 8.5/10
Positive points:
- Live meshing
- Scanning speed
- Scan quality
Negative points:
- Price
- Optional software modules
- MacOS/Linux compatibility
The GO!SCAN 3D represents the best in the portable 3D scanner market today. The main strength lies at the very heart of Creaform’s technology, namely its ability to offer live meshing, saving precious minutes compared to competitors’ solutions, with a professional-quality final rendering. However, this quality comes at a high price: the Go!SCAN 3D is a solution only the professional market will be able to afford.
Software is always an important part of the overall experience, and the VXelements software is visually pleasing to and quite complete in terms of offering whether you are a novice or an experienced user. However, you will need initial training and several hours of use to fully master and explore its capabilities. One downside is that additional modules such as VXmodel are only optional, considering the scanner’s budget. If you need any more information, you can visit Creaform’s website HERE.


