


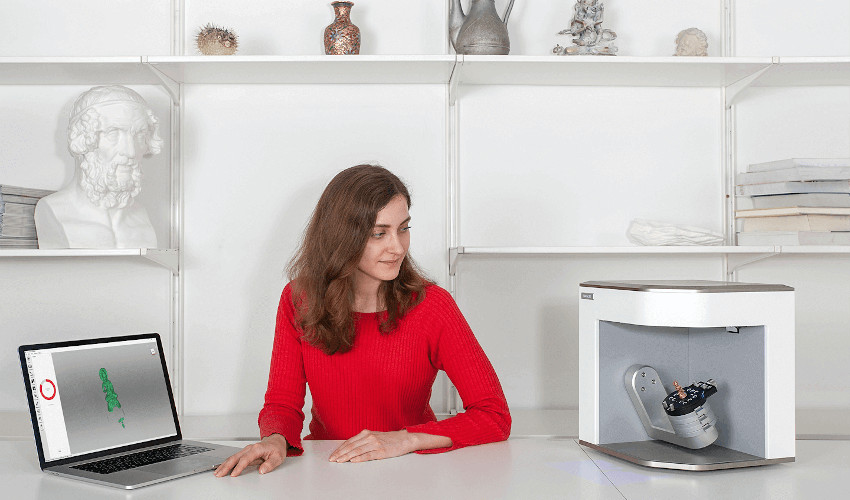
3Dnatives Lab: Testing Artec Micro 3D scanner
Founded in 2007, the manufacturer Artec 3D specializes in the development of professional 3D scanners, installing its equipment at the largest companies in the world including Tesla, Apple, Mercedes or Nike. One of the accomplishments of the the brand is its “Made in Europe” quality with the production of its scanners taking place in Luxembourg – an ambitious and quite unique decision that can only be welcomed. Initially, Artec 3D has made a place for itself on the market thanks to the success of its portable models Eva and Spider. Since then, the manufacturer has widened its range of products, with, notably, the Artec Micro, an equipment specially designed for the digitization and inspection of small parts such as mechanical components, jewelry parts or dental models with a starting price of 27.900€ or $29,300.
One of the strengths of the Artec Micro 3D scanner lies in its handling and the promise of being able to scan a part in one click. The Micro is presented as a fully automated fixed 3D scanner, allowing the scanning of parts up to 90 x 60 x 60 mm with an accuracy up to 10 microns and a minimum resolution of 29 microns. The Micro also offers the possibility to scan the texture with a resolution of about 6.4MP. Recently, 3Dnatives had the chance to get our hands on the Artec Micro for a complete test. Is the scanner really that easy to use? What type of parts can actually be scanned? Is it worth its selling price? Find below our feedback.
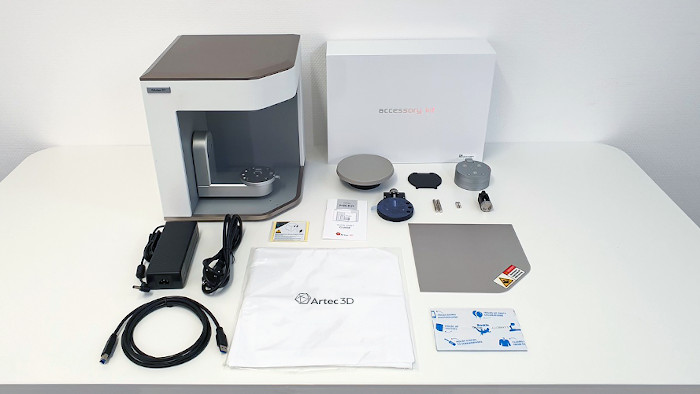
The Artec Micro is delivered with a calibration tray, 3 types of clamps, adhesive paste, spacers, a USB 3.0 cable, a power cable, a protection mat, and spare air filters.
1. Unpacking Artec Micro 3D scanner
Once removed from its wooden case, the Artec Micro reveals its compact proportions of 290 x 290 x 340 mm and its relatively minimalist style with a grey plastic top panel and a white metal side fairing. Its rigid structure and its weight of 12 kg give the scanner a real feeling of reliability. When unpacking the Micro, one discovers all the included accessories, namely a calibration tray, three different types of clamps to fix the part to be scanned, adhesive paste (Patafix type), spacers (to bring very small parts closer to the cameras), a USB 3.0 cable, a power supply cable, a protection mat, and finally spare air filters.
The part to be scanned is fixed on a plate placed at the end of an “L” shaped arm that moves on 2 axes; the scanner then comes to capture it in 360° autonomously. Using a blue LED light source, the scanner projects blue lines on the part and interprets the distortion of the lines using two fixed cameras to create a digital replica of the part.
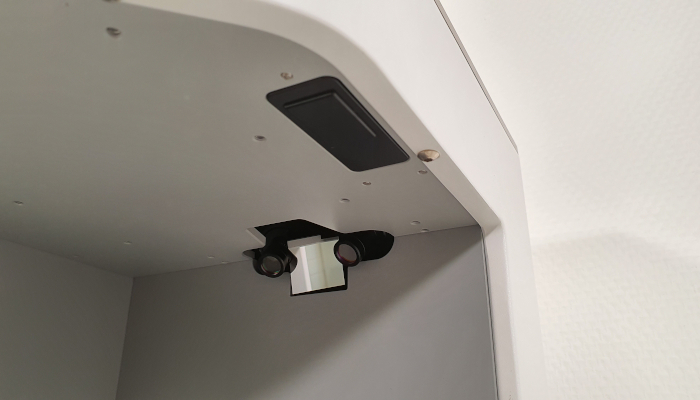
The Artec Micro is equipped with two cameras as well as a mirror to acquire the cloud of points
2. Installing Artec Micro
Like a paper printer, the installation of the Artec Micro starts with the installation of the scanner drivers via the installation menu of the Artec Studio software. Once installed, you will need to connect the power plug and then the USB 3.0 cable to the computer before turning on the equipment using the switch on the back. All in all, a quick and easy installation.
Being a fixed scanner, the specificity of the installation of the Artec Micro is happening of the scanning tray. The clamps, as well as the spacers, will have to be installed and adapted according to the part which one wishes to digitize, with the objective to place the object at an optimal distance from the cameras but also to fix it firmly to avoid shifts during the scanning.
The spacers will be attached to each other via a magnetic mounting system. There are 3 different types of clamps to fixate the object: a vise that allows you to fix the smallest objects, a gum jig on which you can fix the object using adhesive paste (Blu Tack) and finally a screw jig equipped with 4 screws for larger objects. However, there is a small downside to this last type of clamp – its screws tend to create shadows on the object during the scanning phase. So, be careful to position the object well or to scan the object a second time in another position (see the scan fusion below).
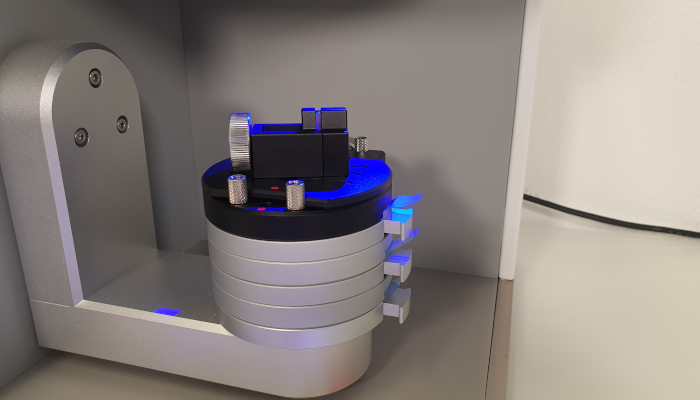
The Artec Micro is delivered with several spacers and 3 types of clamps to fixate the objects that will have to be installed depending on the part to be scanned
In order to finalize the installation of the Artec Micro, you will need to calibrate the scanner, and this step will have to be repeated once you transport the Micro or after a long period of not using it. To do so, you will have to start by placing the magnetic calibration tray provided on two of the risers. The procedure starts directly from the Artec Studio software. In a few seconds and in a completely automatic way, the Artec Micro captures the tray from different positions. The scanner is then calibrated and ready to be used.
A last preparation step may be mandatory for “difficult” parts to be scanned, which typically includes black, transparent or shiny surfaces. In that case Artec recommends to use an anti-reflection spray (not supplied) in order to give a matt finish to the object. The manufacturer has created a dedicated guide with many recommendations on this subject, the article is available HERE.
3. Artec Studio software
The manufacturer has developed its own software, called Artec Studio, to control all its products. As is the case with almost any 3D scanner, the Artec Studio software will require a powerful computer (unfortunately, it is not compatible with Mac OS and Linux). Typically, to run Artec Studio, the manufacturer recommends to use a PC running Windows 10 x 64 and equipped with an i5 or i7 processor and a minimum of 32Gb of RAM. On a positive note, a big effort has been made on the languages available within the software since there are more than 15 available.
For the test, we used the Artec Studio 14 version, however, the manufacturer has released a new version Artec Studio 15 in the meantime, including new features but also improved computing performance. An option for “Intelligent Scan” is also available, which automatically defines the optimal “scan path”.
Visually, Artec Studio is neat and easy to use with its menu bar on the left side of the screen including the main options, such as the “Scan” mode which, as its name indicates, allows to start the actual scanning. After scanning the part, many options will be available in order to rotate or realign the model, to make various measurements, to modify or delete elements of the part using selection tools such as lasso, 2D, 3D or automatic plan, but also to fill the remaining holes or to play with the texture. Another interesting option offered by Artec Studio is the ability to import an original CAD model and align it with the digitized model in order to perform a quality control and thus observe possible differences.
The Artec Studio software allows to control the 3D Micro scanner as well as the other products of the manufacturer such as the Leo, the Eva or the Spider.
Once finalized, the export can then be done in many formats including OBJ, PLY, WRL, STL, AOP, ASC, Disney PTX (PTEX), E57, XYZRBG. Note that many keyboard shortcuts have been designed by Artec 3D for most of the available tools. The other important detail about Artec Studio is that it runs on a relatively unique subscription system. The subscription prices are 800€ per year for the last version Artec Studio 15 or 2 000€ for a lifetime subscription, including all future updates of the software. This cost will be added in addition to the purchase price of the scanner.
4. First scans
To start scanning, click on the first Scan icon in the left menu of the Artec Micro software. A first panel will then open with a real-time preview of the object’s brightness as well as various options. The first parameter to be defined thus concerns the level of brightness of the scan, which will be all the weaker when the part is white and shiny and all the more important when the part is black and matt. To adjust the level of brightness, you can use the real-time preview in order to minimize the point clouds of red color, symbolizing zones with little luminosity.
The second parameter concerns the “scanning path”, a specificity of the fixed scanners. Concretely, the software asks to choose the type of path, 9 by default, that the scanner will follow in order to capture the different angles of the object. The size of the object but also its geometry (i.e. the complexity of its design) will be the two criteria to be taken into account in order to choose the adequate path. Note that the scanner offers the option to add the capture of a single angle if some data is missing (typically a “hole” on the object you just scanned) and to avoid having to start all the scanning over again.
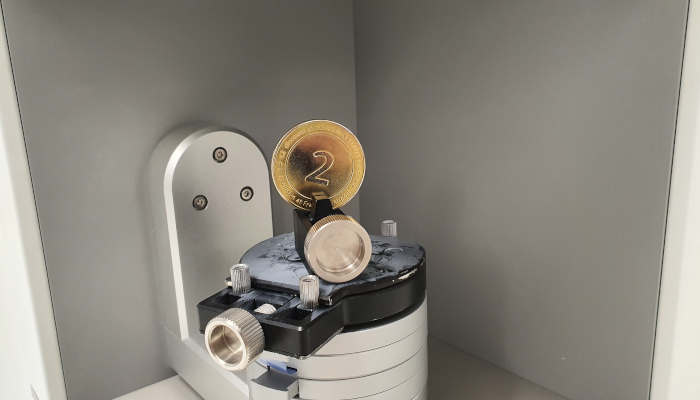
A coin placed on the vise type clamp. Note that we had to use a matte spray to reduce the shine of the coin before scanning.
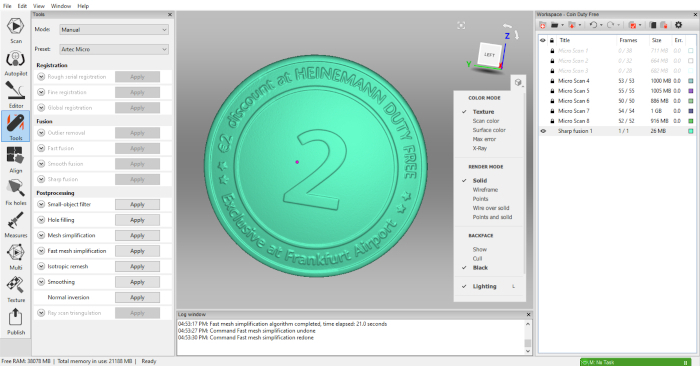
The result obtained from scanning the part. One will appreciate the clarity of the writings which measure only a few millimeters.
The “Preview” mode corresponds to the base path and will only take 6 captures of the object. This is the mode to use to get a quick preview (less than 30 seconds) of the 3D model. The Artec Studio 14.1 version also allows you to create your own scanning paths for the most complex objects or objects that are to be scanned many times. These scanning paths involve creating sequences of different angles in relation to the cameras, while minimizing the number of captures in order not to overload the computer resources.
Finally, the high resolution mode allows, as its name suggests, a finer level of detail, with the disadvantage of longer scanning times. Note that to be able to acquire the color of the object, this option must be checked beforehand.
Once the different parameters are filled in and the piece installed on the board, you can finally start the scan. The arm of the scanner then comes to position the platform by following the chosen “scanning path”. From a few seconds to a few minutes will be enough to completely digitize the part before obtaining a first preview on the screen.
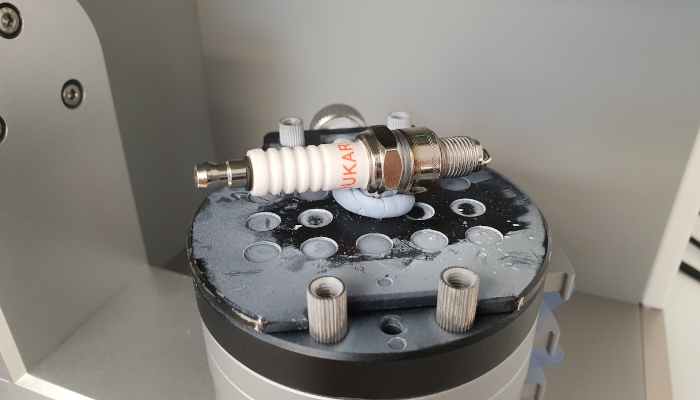
To scan this spark plug, we used adhesive paste on the gum jig (perforated plate). In the second step, we used matifying spray for the shiny parts.

By digitizing twice, then using the Merge mode of scans, we obtain a high-quality replica of the spark plug.
A last step concerns the processing of the scan(s) made in order to move from the scan(s) to a usable mesh. Among the different processing steps, we find the “Global Registration” step which crops the different images between them (in case the part would have moved during the scan), but also the possibility to erase defects or unwanted point clouds (such as the adhesive paste that fixes the object to the board), to realign the object, to merge different versions of the same model, to fill in the holes, to reduce the size of the object or to apply and modify the texture.
As the part is attached to the board, one of the faces of the object is typically hidden from the two cameras. This is why it is recommended to make a second scan of the object (or sometimes even three or four more scans) in a different position, and then to merge the scans. This also happens in Artec Studio during the processing phase. Among the proposed options, the type of fusion (Sharp, Fast and Smooth – the latter not being however recommended for the Artec Micro), the level of resolution to be preserved, or the possibility of filling the existing holes.
In our tests, we started with the scanning of 3 different models, namely a coin with fine details of only a few millimeters, a car spark plug and a colorful animal statuette. For the coin and the spark plug, we had to use a matte spray to reduce potential reflections. The experience of scanning with a fixed scanner is globally much simpler compared to a manual scanner. The fact that it is the scanner that rotates around the model and not the user clearly saves a lot of time, but also avoids errors due to shaking and ensures that the coin is scanned at 360°.
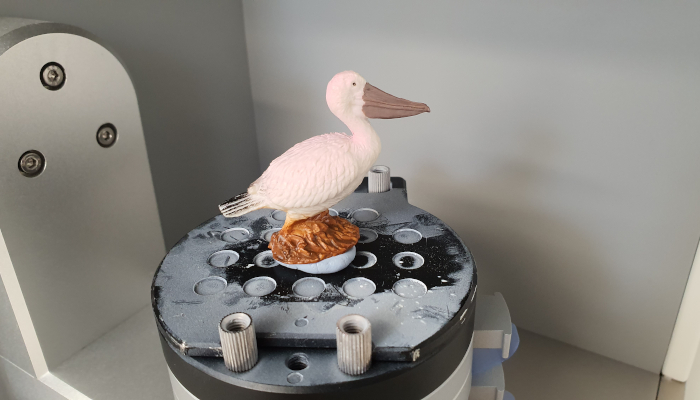
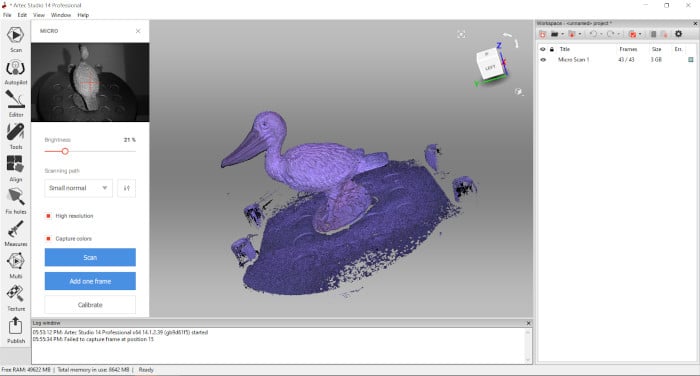
For our third piece, we went with an animal statuette – To fix it to the tray, we used adhesive paste
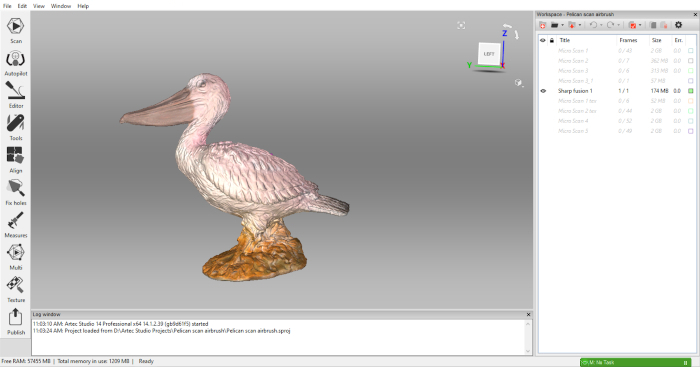
The result of the digitized statuette. Note the color texture faithfully restored.
Find all our 3Dnatives Lab tests HERE
Conclusion
- Contents of the scanner 8/10
- Software 9.5/10
- Scan Quality 10/10
- Ease of Handling 9.5/10
Positive points :
– Ease of use
– Scanning speed
– Software
Negative points :
– Price
– Max scan volume
– MacOS/Linux compatibility
Being its first fixed 3D scanner, the Micro represented a real bet for the manufacturer Artec 3D, better known for its portable scanners such as the Eva, the Spider or more recently the Leo. With its “scanning paths”, the Artec Micro will allow to digitize parts in only a few seconds while reducing the resources needed. Its great performance makes us regret its maximum scan volume is only 90 x 60 x 60 mm, which limits applications to small parts.
In conclusion, the Micro represents a great novelty of Artec 3D, as this type of scanner is still quite rare on the market today. We can only appreciate to have a precise, fast and easy to handle equipment, accompanied by Artec Studio software with its clear and intuitive interface. Its price, starting at 22 900€, to which the subscription to the Artec Studio software will have to be added, might however stop some people from purchasing it, thus making the Artec Micro a 3D scanner clearly dedicated to a professional use.


