


3Dnatives Lab: Testing the KODAK Portrait 3D Printer
KODAK, the company that brought us the disposable and digital cameras entered the 3D printing market in 2018. With the launch of the Portrait, KODAK is officially competing in the market of desktop FDM 3D printers. It has to be said that the Portrait is a result of the collaboration between KODAK and Smart International. The pair has created a dual extrusion 3D printer capable of handling most of the standard and engineering thermoplastics available in the market. On top of this, with its flagship debut, KODAK has brought to life its own material ecosystem and a dedicated cloud-based software.
The KODAK Portrait with everything it came with.
3Dnatives has had the chance of seeing the printer in a few events so far but we now got the opportunity of using and reviewing it in our lab. So, what are its key features and how easy to use is it? What materials can it handle and who is this machine for? And of course, is it worth the €3,000 investment? Find our full review of the KODAK Portrait below.
1. Unboxing the KODAK Portrait
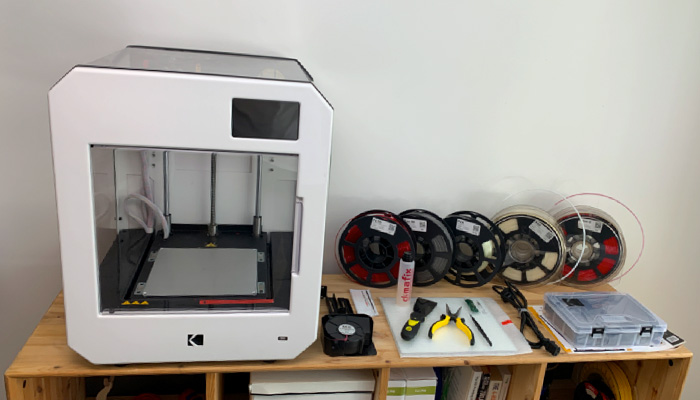
The 3D printer comes almost ready to use in its box, along with its accessories, tools and filaments. With a weight of over 25 kg (55 lbs), two people might be needed to safely take it out of its box. The box includes a power cable, a glass build plate (plus a spare one), 2 spool holders and 2 spool cases, an air filter blower and a toolbox. All components are firmly covered by protective foam and the fragile parts (glass plates) have their own protective covers. The only assembly required is screwing the spool holders and air filter blower on the rear of the machine, practically a 2-minute job.
The box also includes a variety of KODAK branded filament spools. To be exact, other than the standard two 750g PLA+ and PLA tough filament spools, the team also sent us an ABS one, a Nylon 6, a Flex 98, a PETG and a PVA for us to review. The toolbox includes pretty much anything one might need. A spatula, tweezers, needle-nosed pliers, an unclogging needle, a calibration card, grease and oil for the rods, a cloth dust cover and finally an adhesive for the build plate.
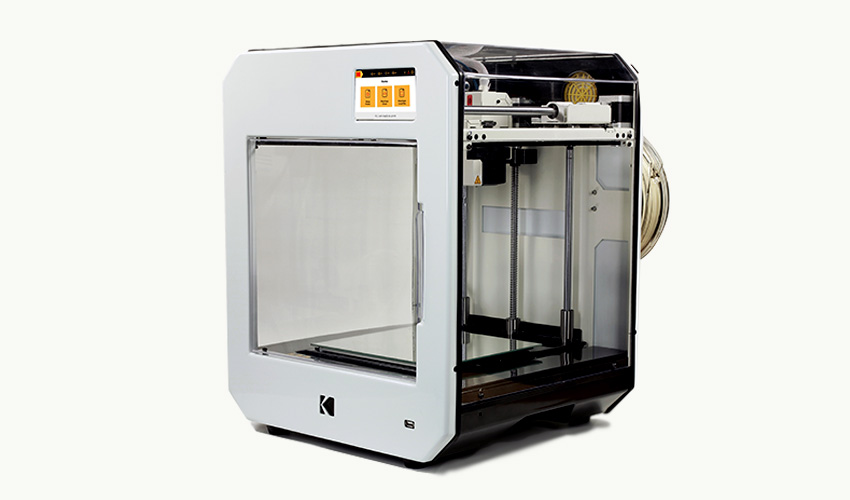
Design-wise, the printer is impressive, covered in plastic walls but well built and durable. On the front, one can see the multi-colour touchscreen that is used to control the printer, as well as a USB slot for transferring files. On the rear, other than the air filter blower and the spools, one can find the power socket as well as the LAN port. As for the sides, they are transparent so that everything happening in the printer is visible from the outside. Finally, the interior continues the list of handy features with a dual extrusion system, a camera for remote monitoring, a magnetically attached build plate and multiple light signals that indicate the printing status.
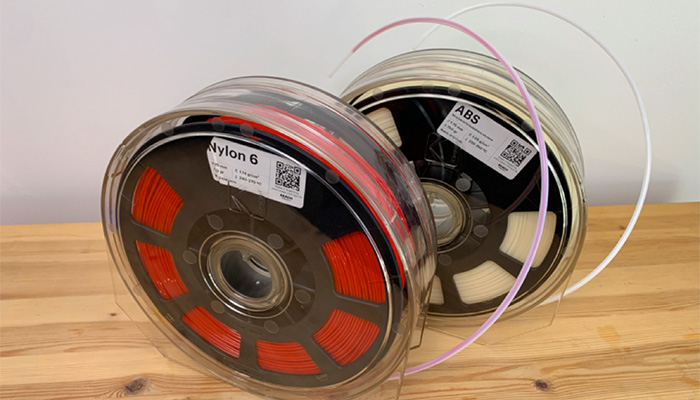
A spool of Nylon 6 and a spool of ABS in their transparent, plastic cases.
In terms of safety, the enclosed chamber with air filtration prevents toxic particles or unwanted odors from getting to the room. Whilst the user’s fingers are safe and away from any hot moving parts, deeming the printer office/school/home friendly. As for its building volume, at 215 x 210 x 235 mm (8.5 x 8.3 x 9.3”), the Portrait can handle decent sized objects. Plus, with a build plate that can heat up to 120°C (248°F) and nozzles that can reach 295ºC (560°F), handling challenging materials like PETG and Nylon, becomes possible.
2. Installation of the KODAK Portrait
Following the minor assembly of the air filter and the spool holders, one just needs to attach the build plate which is fairly easy considering it attaches to the printer magnetically. When plugged in for the first time, the Portrait will ask the user to pick which language they prefer via the touchscreen. Following this, we got some hard time connecting the printer to our Wi-fi but after a couple of efforts and communication with KODAK’s customer service support we managed to connect and update its firmware.Then, we loaded the filaments simply by lifting the mechanism on the rear of the machine and pushing the filament slightly in. Using the touch screen, the user can simply click on the “Load filament” button and the printer will take care of the rest.
Once the filaments are ready, the user can go ahead with calibrating the machine. After finishing with the X-Y and Z calibrations, we printed the pre-installed “Z axis test” design as well, and used the calibration card in order to see if the nozzles needed any extra adjustment. Following this, we were good to go!
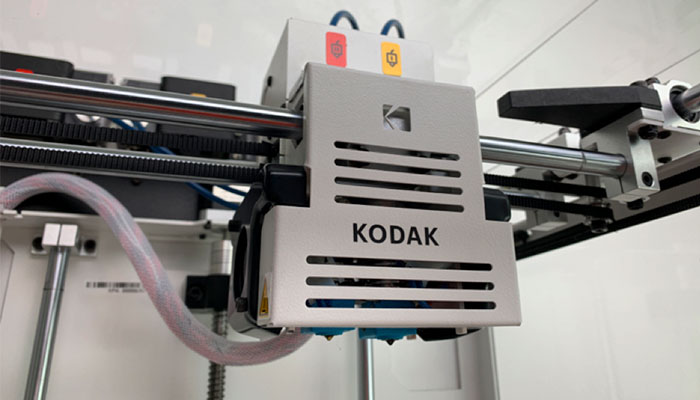
The printhead with the two extruders.
Overall there isn’t much to say about the printer’s hardware. It does everything it is supposed to, whilst looking sharp. The touchscreen was one of our favourite features as it made our lives much easier. The filament cases were a clever addition that not only ensured the filaments were positioned correctly, but also protected them from condensation. As for the build quality of the printer, with capricorn bowden tubes and the famous E3D hotends, KODAK has set the bar high. We did not have high expectations on the camera quality, and to be honest, nor did we need to. The video quality was fine but it was not always available to view.
We sliced the objects we wanted to print in KODAK’s slicer software and uploaded them to the cloud (we could transfer them via USB but the cloud is simpler, faster and hustle-free). Before hitting the “print” button, we first made sure to apply the special adhesive on the heated plate (tip: as this is a two-part adhesive, make sure to shake it well for 20-30 seconds before use). Finally, we could start printing!
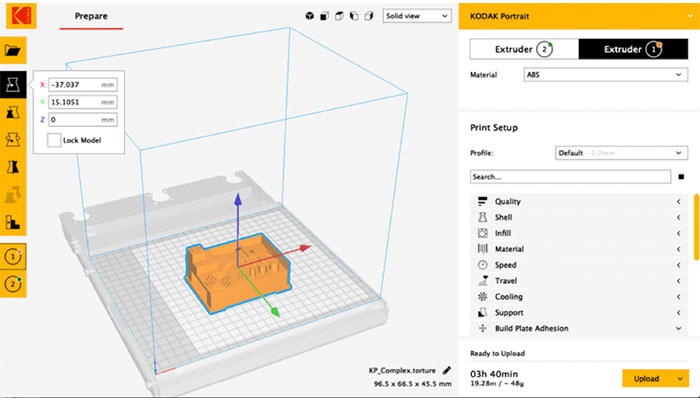
3. KODAK 3D Slicer software
For the slicing and software part, KODAK decided to use an already established, reliable solution. The “KODAK 3D Slicer” is the well known Cura software, adapted for KODAK’s needs. The software can be found on KODAK’s online platform and downloaded in a few minutes. Once downloaded, the user can simply upload the 3D object they wish, adjust it on the software, slice it and upload it to the cloud. A handy bonus of the slicer is that the user can create custom printing profiles. Instructions are provided for everything but to be fair, it is fairly easy to use (especially if you are already a Cura user). The user experience is enjoyable even for more demanding parts, let’s say dual colour ones, that require the use of both nozzles.
The KODAK 3D Slicer.
Even though the parts were sliced properly in the slicer, the connection between the cloud and the printer had issues. As a result, we got in touch with KODAK. Their customer service department was really helpful and found the problem was because of our specific location in France (a problem that has now been fixed in the latest firmware). After a full update of the firmware we were back on track, slicing parts in several materials and uploading them to the cloud.
The user can of course change numerous parameters through the KODAK 3D Slicer (i.e. infill percentage, print speed, temperature etc. ). However, the software will do all that automatically, according to the material you’ve chosen. As for the materials themselves, everything from the typical PLA to the water soluble PVA and flexible plastic Flex 98, has its own material profile. The slicer is spot on, giving the user all the freedom he or she may need, whilst remaining simple and easy to use. We really took advantage of their cloud service too, as it allowed us to simply upload designs easily and quickly and start printing with the touch of a button, remotely.
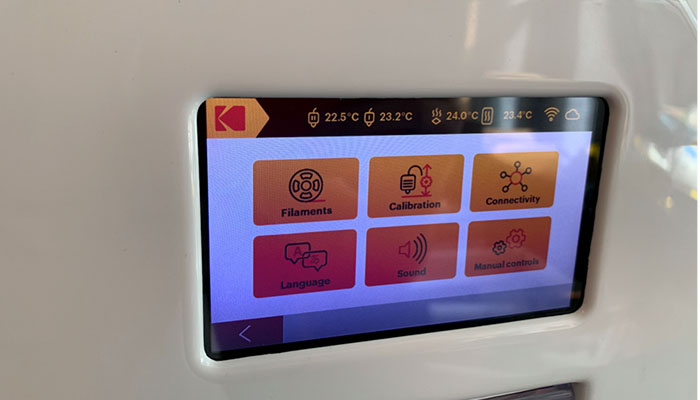
The 5” touchscreen at the top right of the Portrait.
Once a part is sliced and uploaded to the “KODAK 3D Cloud” (powered by 3DprinterOS), the user can send the “print” command from Smart International’s website, literally from anywhere in the world. We found their cloud platform to be one of the best features of the printing experience. All prints are neatly gathered there. Plus, we noticed that under “Printers” one can add multiple printers at once, making it ideal for farm 3D printing. Worth mentioning is the “Dashboard” as well. That’s where the user can find several interesting stats about the printer usage. For example, we learned that during our testing period, we did 73 prints that took a total of 130 hours. Last but not least, KODAK offers “Design services” where the user can send their project idea to a team of designers and get the 3D design sent directly to him or her.
During the printing process, we tended to check the website quite a bit, as it features several useful features. First of all, you can see the exact temperature of the plate, the chamber and each nozzle. Secondly, the remaining time of printing and finally, live streaming of the printing itself through the camera (though this did not always work properly). On the website one can also see all previous prints with their details, plus a fast forwarded short video of each print, and reprint them from there if they wish to.
4. First 3D prints
Offering a dual nozzle 3D printing solution is never an easy task. Combining this with handling different materials (with different characteristics) makes it even tougher. This is maybe where the fact that KODAK developed their own software and materials is a big plus. Initially we expected to get great results with the “common” thermoplastics like PLA and ABS and not so great results with the challenging PETG and Nylon. Somehow, it was the other way around. The Portrait managed to print nylon wind turbines almost to perfection with standard parameters while we often had to play with the slicer to find the right parameters for more standard materials like PLA or ABS.
As shown in the photos below, typical prints like the “torture test” and “benchy” did came out very well without us needing to play with the slicer parameters. Also, it was impressive to see the engineering materials (ABS, Nylon PA6 but also PETG) printing with such quality (the vase and wind turbine are truly spot-on). Last but not least, we of course tried to print single objects with 2 colours, you can see the results in the photo.
For more information on the KODAK Portrait, click HERE.
Below you can also find our rating and summary! What do you think of the KODAK Portrait 3D printer? Let us know in a comment below or on our Facebook and Twitter pages!
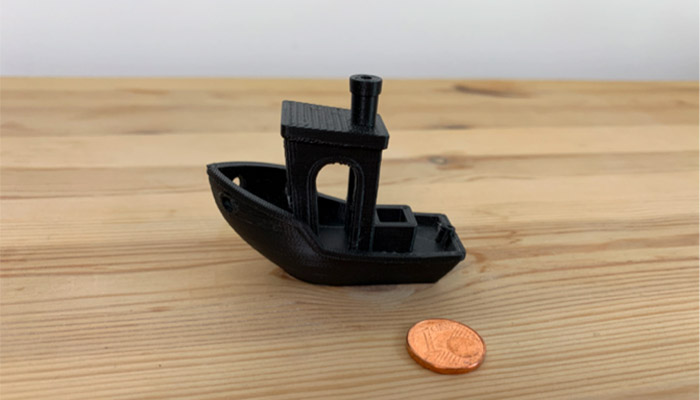
The infamous ‘benchy’ printed in PLA.
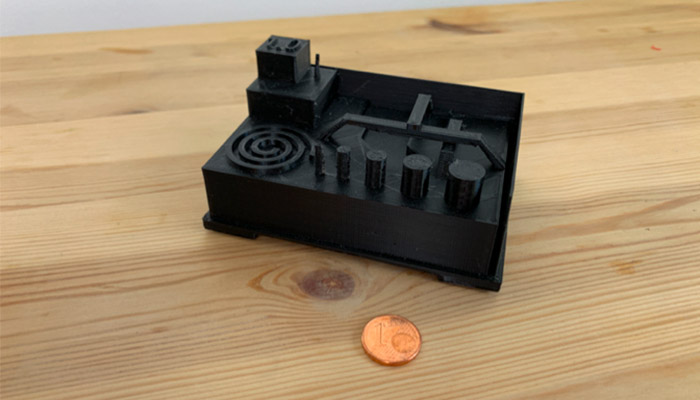
A torture test printed in PLA.
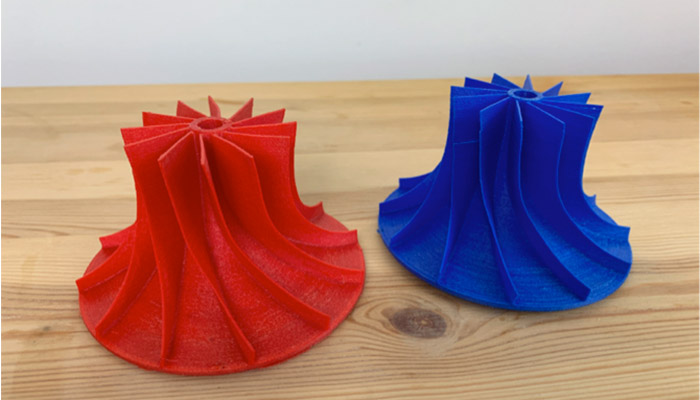
Two flexible wind turbines printed in Nylon (PA6).
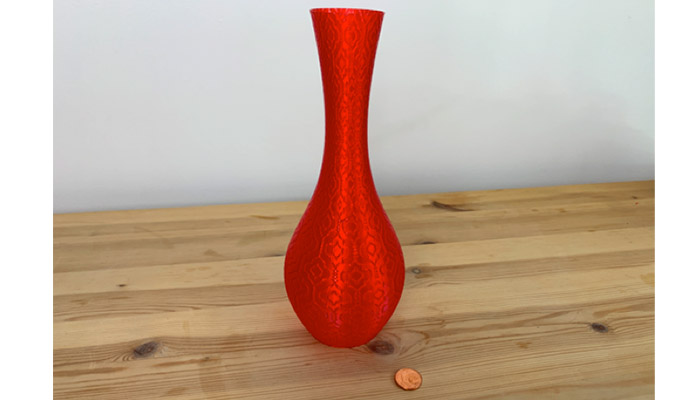
A vase printed to perfection with PETG.
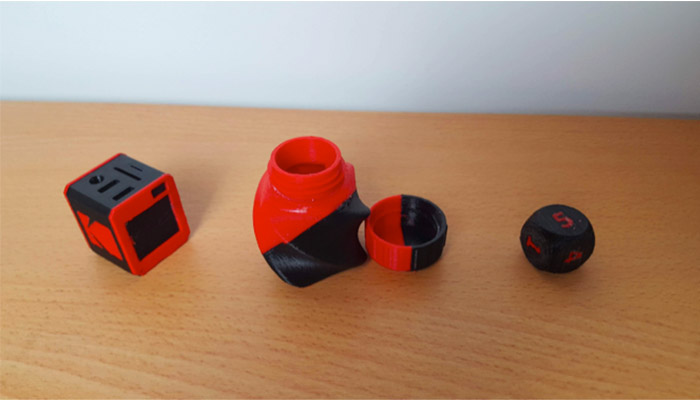
Several dual colour designs printed in PLA with Portrait’s dual extrusion system.

A hollow cube design 3D printed with several materials (from left to right: ABS, PETG, PLAtough, PLA+, Nylon 6)
Conclusion
- 3D PRINTER CONTENT 8/10
- 3D SOFTWARE 8/10
- QUALITY OF 3D PRINTING 7.5/10
- EASE OF USE 8.5/10
Positive points:
– Cloud platform
– Ease of use
– Dual extrusion
Negative points:
– Frequent firmware updates
– Manual calibration
– Wi-fi connection
Most successful players in the field of FDM 3D printers have one thing in common, they all focus on delivering on the 3 pillars that make a 3D printed a reliable machine: Hardware, Software and Materials. With the help of Smart International, KODAK follows this path, building everything from scratch and making sure all 3 are working well together. All that whilst managing to keep the price tag of just €3,000.
Hardware wise, the printer does offer some of the features you would expect from a professional FDM 3D printer, such as a closed chamber, a heated plate capable of heating up to 120°C, a dual-nozzle extruder printing up to 295°C, a large 5″ color touchscreen, WiFi connection and even a HEPA filter. On the software side, the cloud service powered by 3DPrinterOS allows to easily upload and manage a printing queue remotely. As for the materials, the KODAK Portrait has shown some really interesting results with some engineering (meaning challenging to print) materials such as ABS, Flex98 (a TPU material), PETG and Nylon.
The problems we overcame were mainly fixed by the firmware updates which showed how reactive is the KODAK’s support. 3Dnatives had the chance to discuss in person with the team and their requests for feedback only proves how much they want to create the perfect product.
While the Portrait is still relatively new to the market, it looks like the printer is a good fit for professional users in need of 3D printing a wide variety of engineering materials, with the flexibility of a cloud based environment.
Great review. And I printer I will be looking at in the near future but I do have a bunch of questions….
– Can you tell me if the nozzles are replaceable with the autolevel feature with other than E3D nozzles (like Olson Ruby)?
– Is there a printing profile for PC or PC blends?
– I was under the impression that one nozzle had an all-metal hotend and the other one was PTFE. Is that the case and can both nozzles really get up to 295 °C?
– Do you think the 7.5 score in print quality can be improved with manual profile adjustments or firmware upgrades for the more standard materials?
– Finally, did you print any flexible materials and if so what was the quality like on those.